×
- Hello
- Login or Register
- Quick Links
- Live Chat
- Track Order
- Parts Availability
- RMA
- Help Center
- Contact Us
- Shop for
- Volvo Parts
My Garage
My Account
Cart
Genuine Volvo Door Lock
Power Door Lock Actuator- Select Vehicle by Model
- Select Vehicle by VIN
Select Vehicle by Model
orMake
Model
Year
Select Vehicle by VIN
For the most accurate results, select vehicle by your VIN (Vehicle Identification Number).
137 Door Locks found

Volvo Lock Part Number: 30858685
$45.34 MSRP: $53.09You Save: $7.75 (15%)Ships in 1-2 Business DaysProduct Specifications- Other Name: Trunk Lid Latch; Door Lock

Volvo Lock, Driver Side Part Number: 30850806
$117.27 MSRP: $138.46You Save: $21.19 (16%)Ships in 1-2 Business DaysProduct Specifications- Other Name: Lock, Left; Door Lock; Lock
- Position: Driver Side


Volvo Lock, Driver Side Part Number: 30850803
$121.82 MSRP: $143.83You Save: $22.01 (16%)Ships in 1-2 Business DaysProduct Specifications- Other Name: Lock, Left; Door Lock; Lock
- Position: Driver Side
Volvo Lock, Passenger Side Part Number: 30850808
$150.29 MSRP: $177.44You Save: $27.15 (16%)Ships in 1-2 Business DaysProduct Specifications- Other Name: Lock, Right; Door Lock; Lock
- Position: Passenger Side
Volvo Lock, Passenger Side Part Number: 30644386
$117.27 MSRP: $138.46You Save: $21.19 (16%)Ships in 1-2 Business DaysProduct Specifications- Other Name: Lock, Right; Door Lock; Lock
- Position: Passenger Side

Volvo Lock, Front Passenger Side Part Number: 8628224
$285.67 MSRP: $340.09You Save: $54.42 (16%)Ships in 1-2 Business DaysProduct Specifications- Other Name: Lock, Right; Door Latch Assembly, Front Right; Door Lock; Lock
- Position: Passenger Side

Volvo Lock, Rear Driver Side Part Number: 8626185
$302.62 MSRP: $360.25You Save: $57.63 (16%)Ships in 1-2 Business DaysProduct Specifications- Other Name: Lock, Left; Door Latch Assembly, Rear Left; Door Lock; Lock
- Position: Driver Side
Volvo Lock, Rear Passenger Side Part Number: 8626186
$305.88 MSRP: $364.14You Save: $58.26 (16%)Ships in 1-2 Business DaysProduct Specifications- Other Name: Lock, Right; Door Latch Assembly, Rear Right; Door Lock; Lock
- Position: Passenger Side

Volvo Lock Actuator, Rear Part Number: 31349862
$63.34 MSRP: $81.16You Save: $17.82 (22%)Ships in 1-2 Business DaysProduct Specifications- Other Name: Door Latch Assembly, Rear Left; Lock Actuator, Lock Assembly
- Position: Driver Side

Volvo Lock Actuator, Driver Side Part Number: 31349865
$63.34 MSRP: $81.16You Save: $17.82 (22%)Ships in 1-2 Business DaysProduct Specifications- Other Name: Lock; Door Lock Actuator; Door Lock; Lock Actuator, Lock Assembly
- Position: Driver Side
Volvo Lock Actuator, Passenger Side Part Number: 31349869
$63.34 MSRP: $81.16You Save: $17.82 (22%)Ships in 1-2 Business DaysProduct Specifications- Other Name: Lock; Door Lock Actuator; Door Lock; Lock Actuator, Lock Assembly
- Position: Passenger Side


Volvo Lock Part Number: 30802821
$66.03 MSRP: $77.96You Save: $11.93 (16%)Ships in 1-2 Business DaysProduct Specifications- Other Name: Trunk Lid Latch; Door Lock


Volvo Lock Actuator, Driver Side Part Number: 31349858
$70.94 MSRP: $90.90You Save: $19.96 (22%)Ships in 1-2 Business DaysProduct Specifications- Other Name: Lock; Door Latch Assembly; Door Lock Actuator; Door Lock; Lock Actuator, Lock Assembly
- Position: Driver Side
Volvo Lock Actuator, Driver Side Part Number: 31349859
$70.94 MSRP: $90.90You Save: $19.96 (22%)Ships in 1-2 Business DaysProduct Specifications- Other Name: Lock; Door Lock Actuator; Door Lock; Lock Actuator, Lock Assembly
- Position: Driver Side
Volvo Lock Actuator, Passenger Side Part Number: 31349860
$70.94 MSRP: $90.90You Save: $19.96 (22%)Ships in 1-2 Business DaysProduct Specifications- Other Name: Lock; Door Lock Actuator; Door Lock; Lock Actuator, Lock Assembly
- Position: Passenger Side
Volvo Lock Actuator, Passenger Side Part Number: 31349861
$70.94 MSRP: $90.90You Save: $19.96 (22%)Ships in 1-2 Business DaysProduct Specifications- Other Name: Lock; Door Lock Actuator; Door Lock; Lock Actuator, Lock Assembly
- Position: Passenger Side
Volvo Lock Actuator, Driver Side Part Number: 31349863
$70.94 MSRP: $90.90You Save: $19.96 (22%)Ships in 1-2 Business DaysProduct Specifications- Other Name: Lock; Door Lock Actuator; Door Lock; Lock Actuator, Lock Assembly
- Position: Driver Side
Volvo Lock Actuator, Driver Side Part Number: 31349864
$70.94 MSRP: $90.90You Save: $19.96 (22%)Ships in 1-2 Business DaysProduct Specifications- Other Name: Lock; Door Lock Actuator; Door Lock; Lock Actuator, Lock Assembly
- Position: Driver Side
Volvo Lock Actuator, Passenger Side Part Number: 31349866
$70.94 MSRP: $90.90You Save: $19.96 (22%)Ships in 1-2 Business DaysProduct Specifications- Other Name: Lock; Door Lock Actuator; Door Lock; Lock Actuator, Lock Assembly
- Position: Passenger Side

Volvo Lock, Passenger Side Part Number: 8628226
Product Specifications- Other Name: Lock, Right; Door Lock; Lock
- Position: Passenger Side
| Page 1 of 7 |Next >
1-20 of 137 Results
Volvo Door Lock
Volvo Door Lock ensures that every journey is secure because it combines smart electronics with strong mechanics which lock and unlock the cabin at the touch of a button. Volvo earned global respect for producing cars, trucks, and buses with a combination of Swedish durability, clean design, intuitive controls, and industry-leading safety features such as the pioneering three-point seat belt. The brand is also pushing towards greener times with electric powertrains and plug-in hybrids, demonstrating that protection of people and planet can ride hand in hand. Every Volvo is characterized by responsive brakes, clear instrumentation, and cabins shaped for comfort so that young and experienced drivers can have equal confidence in traffic or on open roads. Matching this safety culture, the Volvo Door Lock system is the first line of defense against unwanted entry but adds daily convenience. Early versions applied keys and manual rods but the modern Door Lock incorporates electric actuators, remote keyless entry fobs, and auto locking which engages at speed but then releases in park and owners are protected without any extra effort. The latch and striker are still familiar, but energy now passes through smart circuitry that can even report voltage health for quick checks. Because the Door Lock keeps evolving with every Volvo on the road, it provides universal value, protecting each one with the same combination of mechanical strength and intelligent electronics that drivers trust.
Trust OEM Door Lock for quality that holds up. These parts use top-tier materials to keep your ride running smooth. Because they match exact Volvo specs, you get a flawless fit and a hassle-free install every single time. No more fighting with parts that just won't line up. It is easy to search our massive stock of genuine Volvo options at prices you will really like. Every part comes with a real manufacturer's warranty and a simple return policy. Plus, we ship fast to get your order to you. Shop with confidence and give your Volvo the reliability it deserves.
Volvo Door Lock Parts and Q&A
- Q: How to remove and install the door lock cylinder on Volvo 740?A:For the greatest effectiveness and longest element life, keep the windshield and wiper blades clean as dirt, tree sap and road tar can cause streaking, smearing, and deterioration of the blades. Wash the windshield with a commercial glass cleaner at least once a month and wipe off the rubber blades with a wet rag. Windshield wipers should not be moved across the face of the windshield by hand because it can damage the motor and driving mechanism. To inspect or change the wiper blade elements, set the wiper switch to the setting indicating that the machine is in a low speed position and set the ignition switch to the ACC position, then set the ignition switch to the OFF position when the blades are approximately vertical. Examine the wiper blade elements for cracks, breaks or tears, and replace them, if necessary, immediately since replacement intervals vary depending on usage, but are generally limited to a one-year period in terms of ozone deterioration. If the wiper pattern is smeared or streaked or if the blade chatters replace the elements, preferably in pairs. Aftermarket blades might use different types of refills and there are several kinds of typical types. The Anco type has a release button to allow easy replacement of the refill, some Trico refills require a small screwdriver to release the refill from the retaining tab. Other Trico refills contain metal tabs that are unsealed by squeezing them together so the rubber filler can be withdrawn and replaced. Polycarbonate refills have a simple locking device for easy release and installation. For Tridon refills, remove wiper blade & twist to pull out the backing strip, make sure to replace with identical type. Always follow the part manufacturer's instructions carefully and make sure all the frame jaws are engaged during installation in order to prevent scratching the glass.
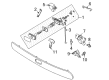
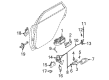
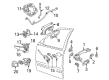
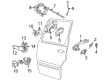
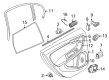
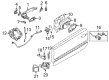
- Q: How to remove and refit the inner trim panel and door lock assembly on Volvo V40?A:In order to remove the inner trim panel of your vehicle, you need to start freeing the rod from the handle and then prising out the inner area of the handle link rod clip. Next, remove the retaining screws and remove the handle from the door. For the front door lock assembly, removing the insulation panel on the back of the door to access the lock parts, be sure to remove the screws and the loudspeaker if the insulation panel must be removed entirely. If the support bracket is riveted, drill out the rivets and have some new ones ready for fitting. Undo the retaining screws to remove the side impact protection system striker and insert and close the window fully closing the window sealing strip from its rear guide. Remove the screw from the bottom of the guide and manoeuvre it out its way through the door opening. Unclip the inner handle link rod guide and the lock button link rod, remove the lock retaining screws, disconnect the wiring connector to the central locking actuator, remove the exterior handle and lock button link rods and then manoeuvre the lock assembly out. For the front door exterior handle, unclip the handle link rods from the door lock assembly, trace and disconnect the wiring connector from the lock microswitches then remove the retaining bolts and unclip the inner and outer sections of the handle assembly. For the front door lock cylinder, remove the exterior handle, insert the key into the cylinder, unhook the link rod and remove the retaining screw before removing the lock cylinder and key assembly. For the rear door lock assembly, remove the inner handle and peel the insulation panel off to get at the lock assembly, removing the trim panel support bracket if required. Open the window to remove the little outer trim panel at the back of the door window frame then remove the holding bolts from the window glass rear guide and free the sealing strip. Release retaining clip to separate lock link rod to inner button pivot, unclip exterior handle link rod to lock assembly and remove lock retaining screws before disconnecting wiring connector. For the rear door exterior handle, unclip the exterior handle link rod from the lock assembly, remove the access plug and take out the handle retaining bolts before manoeuvring the handle assembly out. Refitting consists of reversing the removal process and being sure to re-tighten all the fasteners to the specified torque values, re-clipping and adjusting the link rods, and testing the operation of the locks and handles before reattaching the insulation panel and the trim panel. Finally, check to see that the back edge of the door is flush with the body, and make adjustments to the lock striker if necessary.


Related Volvo Parts
 Volvo Hood Latch
 Volvo Bumper
 Volvo Hood
 Volvo Hood Release Cable
 Volvo Window Motor
 Volvo Wiper Blade
 Volvo Bumper Reflector
 Volvo Door Lock Cylinder
 Volvo Hood Hinge
 Volvo Liftgates
 Volvo Weather Strip
 Volvo Window Crank Handles
Browse by Model
240 Door Lock 244 Door Lock 245 Door Lock 740 Door Lock 760 Door Lock 780 Door Lock 850 Door Lock 940 Door Lock 960 Door Lock C30 Door Lock C40 Recharge Door Lock C70 Door Lock S40 Door Lock S60 Cross Country Door Lock S60 Door Lock S70 Door Lock S80 Door Lock S90 Door Lock V40 Door Lock V50 Door Lock V60 Cross Country Door Lock V60 Door Lock V70 Door Lock V90 Cross Country Door Lock V90 Door Lock XC40 Door Lock XC40 Recharge Door Lock XC60 Door Lock XC70 Door Lock XC90 Door Lock