×
- Hello
- Login or Register
- Quick Links
- Live Chat
- Track Order
- Parts Availability
- RMA
- Help Center
- Contact Us
- Shop for
- Volvo Parts
My Garage
My Account
Cart
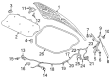
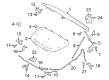
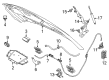
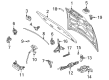
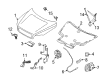
Genuine Volvo Hood Latch
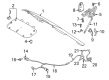
Engine Hood Latch- Select Vehicle by Model
- Select Vehicle by VIN
Select Vehicle by Model
orMake
Model
Year
Select Vehicle by VIN
For the most accurate results, select vehicle by your VIN (Vehicle Identification Number).
39 Hood Latches found

Volvo Safety Catch, Driver Side Part Number: 31352886
$17.57 MSRP: $22.50You Save: $4.93 (22%)Ships in 1-2 Business DaysProduct Specifications- Other Name: Lock Brace; Hood Latch; Safety Catch
- Position: Driver Side
Volvo Safety Catch, Passenger Side Part Number: 31371488
$17.57 MSRP: $22.50You Save: $4.93 (22%)Ships in 1-2 Business DaysProduct Specifications- Other Name: Lock Brace; Hood Latch; Safety Catch
- Position: Passenger Side

Volvo Safety Catch Part Number: 32244037
$28.73 MSRP: $36.80You Save: $8.07 (22%)Ships in 1-2 Business DaysProduct Specifications- Other Name: Hood Latch

Volvo Safety Catch Part Number: 31425789
$61.77 MSRP: $79.76You Save: $17.99 (23%)Ships in 1-2 Business DaysProduct Specifications- Other Name: Hood Latch


Volvo Safety Catch Part Number: 31425790
$61.77 MSRP: $79.76You Save: $17.99 (23%)Ships in 1-2 Business DaysProduct Specifications- Other Name: Hood Latch

Volvo Safety Catch Part Number: 31425791
$61.77 MSRP: $79.76You Save: $17.99 (23%)Ships in 1-2 Business DaysProduct Specifications- Other Name: Hood Latch

Volvo Lock, Passenger Side Part Number: 9152932
$64.89 MSRP: $76.62You Save: $11.73 (16%)Ships in 1-2 Business DaysProduct Specifications- Other Name: Hood Lock, Right; Hood Latch; Lock
- Position: Passenger Side

Volvo Safety Catch Part Number: 31457172
$74.42 MSRP: $96.10You Save: $21.68 (23%)Ships in 1-2 Business DaysProduct Specifications- Other Name: Hood Catch Connector; Hood Latch; Catch


Volvo Lock Part Number: 30716529
$87.08 MSRP: $112.46You Save: $25.38 (23%)Ships in 1-2 Business DaysProduct Specifications- Other Name: Hood Lock; Hood Latch

Volvo Lock Part Number: 30716530
$87.08 MSRP: $112.46You Save: $25.38 (23%)Ships in 1-2 Business DaysProduct Specifications- Other Name: Hood Lock; Hood Latch

Volvo Latch Assembly Part Number: 31218474
$87.08 MSRP: $112.46You Save: $25.38 (23%)Ships in 1-2 Business DaysProduct Specifications- Other Name: Hood Lock; Hood Latch; Lock

Volvo Latch Assembly, Driver Side Part Number: 31218475
$87.08 MSRP: $112.46You Save: $25.38 (23%)Ships in 1-2 Business DaysProduct Specifications- Other Name: Hood Lock; Hood Latch; Hood Switch, Latch Assembly, Lock
- Position: Driver Side

Volvo Latch Assembly, Passenger Side Part Number: 31356005
$87.08 MSRP: $112.46You Save: $25.38 (23%)Ships in 1-2 Business DaysProduct Specifications- Other Name: Hood Lock; Hood Latch; Latch Assembly, Lock
- Position: Passenger Side

Volvo Latch Assembly, Passenger Side Part Number: 31356007
$87.08 MSRP: $112.46You Save: $25.38 (23%)Ships in 1-2 Business DaysProduct Specifications- Other Name: Hood Lock; Hood Latch; Latch Assembly, Lock
- Position: Passenger Side

Volvo Latch Assembly, Passenger Side Part Number: 31371016
$87.08 MSRP: $112.46You Save: $25.38 (23%)Ships in 1-2 Business DaysProduct Specifications- Other Name: Hood Lock; Hood Latch; Latch Assembly, Lock
- Position: Passenger Side
Volvo Latch Assembly, Passenger Side Part Number: 31425845
$87.08 MSRP: $112.46You Save: $25.38 (23%)Ships in 1-2 Business DaysProduct Specifications- Other Name: Hood Lock; Hood Latch; Latch Assembly
- Position: Passenger Side
Volvo Latch Assembly Part Number: 31425973
$87.08 MSRP: $112.46You Save: $25.38 (23%)Ships in 1-2 Business DaysProduct Specifications- Other Name: Hood Lock; Hood Latch; Lock
Volvo Latch Assembly Part Number: 31425974
$87.08 MSRP: $112.46You Save: $25.38 (23%)Ships in 1-2 Business DaysProduct Specifications- Other Name: Hood Lock; Hood Latch; Lock
Volvo Latch Assembly, Driver Side Part Number: 31425975
$87.08 MSRP: $112.46You Save: $25.38 (23%)Ships in 1-2 Business DaysProduct Specifications- Other Name: Hood Lock; Hood Latch; Latch Assembly, Lock
- Position: Driver Side
Volvo Latch Assembly Part Number: 31457176
$87.08 MSRP: $112.46You Save: $25.38 (23%)Ships in 1-2 Business DaysProduct Specifications- Other Name: Hood Lock; Hood Latch; Lock
| Page 1 of 2 |Next >
1-20 of 39 Results
Volvo Hood Latch
The Volvo Hood Latch helps keep the hood firmly closed for every drive to protect from sudden exposure of vision and critical components. Volvo gained worldwide recognition for incorporating Scandinavian design with high levels of safety, and drivers love its clean lines, intuitive controls, and pioneering three-point seat belt that set new industry standards. The company started in 1927 in Gothenburg, and it is now providing cars, trucks, and buses that embrace electric powertrains, efficient braking systems, and smart instrumentation to create confident journeys. Volvo is also very keen on environmental development, so its plug-in hybrids combine quiet torque and reduced emissions with the Swedish brand's traditional emphasis on comfort and durability. Within that safety-minded lineup, the Hood Latch is a little guardian of great importance that works with a solid interior handle, a flexible steel cable, and a spring-loaded catch to lock the bonnet until the driver decides to check out the engine. Unlike all those improvised fixes, this Hood Latch integrates perfectly with all Volvo models, providing a uniform feel and quick release motion that allows owners to access the battery, radiator, or fluid reservoirs without any hassle. A secondary safety catch provides an extra level of safety, avoiding accidental openings at speed and reinforcing Volvo expectations for reliability. Regular cleaning and light lubrication make the Hood Latch responsive and ensure many years of secure travel under varied road and weather conditions.
Trust OEM Hood Latch for quality that holds up. These parts use top-tier materials to keep your ride running smooth. Because they match exact Volvo specs, you get a flawless fit and a hassle-free install every single time. No more fighting with parts that just won't line up. It is easy to search our massive stock of genuine Volvo options at prices you will really like. Every part comes with a real manufacturer's warranty and a simple return policy. Plus, we ship fast to get your order to you. Shop with confidence and give your Volvo the reliability it deserves.
Volvo Hood Latch Parts and Q&A
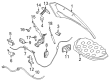
- Q: How to remove and refit the Hood Latch assembly on Volvo V40?A:To remove the hood latch assembly, you will first need to open the hood and remove the protective cover, if any. In the event that a microswitch is used for the alarm system, follow the wiring back from the switch, remove it from the clips, and disconnect it from the main wiring harness to release the switch with the hood latch assembly. Next, remove the retaining bolts to release the hood latch assembly from the crossmember, unclip the release cable and remove the hood latch from the car. For refitting, reconnect the release cable to the hood latch, lay the hood latch on the crossmember and lock it with the retaining bolts and tighten them to the specified torque. Check that the wiring of the microswitch is properly routed and clamped with clips then reconnect the connector. After that, test the function of the release lever and cable, close the hood and check the functionality of the hood latch. If adjustments are required, loosen the retaining bolts, move the hood latch into place and retighten the bolts to specified torque. Finally, lubricate the hood latch with multi-purpose grease and replace the protective cover, if possible.
- Q: How to remove and refit the Hood Latch and headlights on Volvo V70?A:To remove the front indicator lights and headlights, first remove the 12 bolts which hold the hood latch slam panel to the vehicle body. Next, undo the two catch retaining bolts and detach the cable end, available from the back of the front panel. For refitting in the reverse order of removal, being careful not to tighten the catch retaining screws too much in the beginning. After shutting the hood latch to centralize the catch, tightly tighten the retaining screws.


Related Volvo Parts
 Volvo Hood
 Volvo Body Control Module
 Volvo Door Lock
 Volvo Door Lock Actuator
 Volvo Hood Release Cable
 Volvo Door Hinge
 Volvo Door Lock Cylinder
 Volvo Door Screws
 Volvo Hood Hinge
 Volvo Lift Support
 Volvo Trunk Lid Latch
 Volvo Weather Strip
Browse by Model
240 Hood Latch 244 Hood Latch 245 Hood Latch 740 Hood Latch 760 Hood Latch 780 Hood Latch 850 Hood Latch 940 Hood Latch 960 Hood Latch C30 Hood Latch C40 Recharge Hood Latch C70 Hood Latch S40 Hood Latch S60 Cross Country Hood Latch S60 Hood Latch S70 Hood Latch S80 Hood Latch S90 Hood Latch V40 Hood Latch V50 Hood Latch V60 Cross Country Hood Latch V60 Hood Latch V70 Hood Latch V90 Cross Country Hood Latch V90 Hood Latch XC40 Hood Latch XC40 Recharge Hood Latch XC60 Hood Latch XC70 Hood Latch XC90 Hood Latch