×
- Hello
- Login or Register
- Quick Links
- Live Chat
- Track Order
- Parts Availability
- RMA
- Help Center
- Contact Us
- Shop for
- Volvo Parts
My Garage
My Account
Cart
Genuine Volvo Fuel Tank
Gas Tank- Select Vehicle by Model
- Select Vehicle by VIN
Select Vehicle by Model
orMake
Model
Year
Select Vehicle by VIN
For the most accurate results, select vehicle by your VIN (Vehicle Identification Number).
47 Fuel Tanks found

Volvo Expansion Tank Part Number: 9471402
$126.00 MSRP: $161.44You Save: $35.44 (22%)Ships in 1-2 Business DaysProduct Specifications- Other Name: Fuel Tank

Volvo Fuel Tank Part Number: 30620584
$374.88 MSRP: $446.28You Save: $71.40 (16%)Ships in 1-2 Business Days

Volvo Fuel Tank Part Number: 8628589
$374.88 MSRP: $446.28You Save: $71.40 (16%)Ships in 1-2 Business Days
Volvo Fuel Tank Part Number: 9445482
$575.87 MSRP: $685.56You Save: $109.69 (16%)Ships in 1-2 Business Days
Volvo Fuel Tank Part Number: 30794713
$585.61 MSRP: $762.52You Save: $176.91 (24%)Ships in 1-2 Business Days
Volvo Fuel Tank Part Number: 31261723
$585.61 MSRP: $762.52You Save: $176.91 (24%)Ships in 1-2 Business Days

Volvo Fuel Tank Part Number: 32312199
$585.61 MSRP: $762.52You Save: $176.91 (24%)Ships in 1-2 Business DaysProduct Specifications- Replaces: 32224730, 32242456

Volvo Fuel Tank Part Number: 8629908
$414.40 MSRP: $493.33You Save: $78.93 (16%)Ships in 1-2 Business DaysVolvo Fuel Tank Part Number: 32312203
$585.61 MSRP: $762.52You Save: $176.91 (24%)Ships in 1-2 Business DaysProduct Specifications- Replaces: 31684275

Volvo Fuel Tank Part Number: 30792713
$1143.64 MSRP: $1384.55You Save: $240.91 (18%)Ships in 1-2 Business Days
Volvo Fuel Tank Part Number: 31405483
$951.41 MSRP: $1259.81You Save: $308.40 (25%)Ships in 1-2 Business Days

Volvo Fuel Tank Part Number: 31405484
$951.41 MSRP: $1259.81You Save: $308.40 (25%)Ships in 1-2 Business Days
Volvo Fuel Tank Part Number: 32312513
$951.41 MSRP: $1259.81You Save: $308.40 (25%)Ships in 1-2 Business Days
Volvo Fuel Tank Part Number: 32312515
$951.41 MSRP: $1259.81You Save: $308.40 (25%)Ships in 1-2 Business Days
Volvo Fuel Tank Part Number: 32325555
$951.41 MSRP: $1259.81You Save: $308.40 (25%)Ships in 1-2 Business DaysProduct Specifications- Replaces: 31478244, 32322071
Volvo Fuel Tank Part Number: 32325587
$951.41 MSRP: $1259.81You Save: $308.40 (25%)Ships in 1-2 Business DaysProduct Specifications- Replaces: 31459967, 32322084
Volvo Fuel Tank Part Number: 32325589
$951.41 MSRP: $1259.81You Save: $308.40 (25%)Ships in 1-2 Business DaysProduct Specifications- Replaces: 31355157, 32322085

Volvo Fuel Tank Part Number: 31336839
$1351.99 MSRP: $1790.24You Save: $438.25 (25%)Ships in 1-2 Business Days
Volvo Fuel Tank Part Number: 8631059
Product Specifications- Other Name: Fuel Tank 2505
Volvo Fuel Tank Part Number: 31392172
| Page 1 of 3 |Next >
1-20 of 47 Results
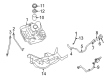
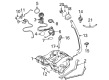
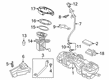
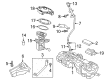
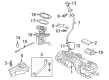
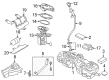
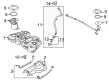
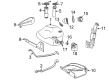
Volvo Fuel Tank
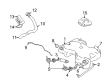
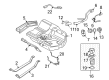
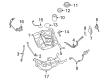
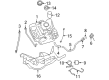
The Volvo Fuel Tank ensures protection of fuel with intelligent baffling that keeps fuel secure on sharp turns, ensuring constant engine power in every Volvo adventure. Beyond this crucial element, Volvo is unique for its innovations in safety, such as the three-point seat belt, responsive brakes, and accessibly comprehensible instrumentation which make it easy and safe to drive every day. The brand combines clean Scandinavian design with controls a teenager can understand in a short time, while its expanding range of hybrids indicates a commitment to a quieter, cleaner future. Every Volvo also feels solid on the road, with careful tuning of the chassis that delivers a balance of comfort and confidence that families appreciate whether on a long road trip or city errand. Turning again to the Fuel Tank, its combination of metal or high-density polyethylene construction defies rust, road salt, and impacts, and internal baffles muffle slosh noise so that rides remain calm. The Fuel Tank cooperates with an electric pump and sender to feed the engine and make the dash gauge honest, and links to the EVAP system trap vapors to make the air cleaner. Lock rings, seals, and stiff straps secure the unit tightly beneath the car, preventing leaks even on bumpy surfaces. Because it is designed to the universal Volvo standards, the Fuel Tank matches varied body styles and capacities throughout the lineup, all offering the same consistent, reliable flow, mile after mile.
Trust OEM Fuel Tank for quality that holds up. These parts use top-tier materials to keep your ride running smooth. Because they match exact Volvo specs, you get a flawless fit and a hassle-free install every single time. No more fighting with parts that just won't line up. It is easy to search our massive stock of genuine Volvo options at prices you will really like. Every part comes with a real manufacturer's warranty and a simple return policy. Plus, we ship fast to get your order to you. Shop with confidence and give your Volvo the reliability it deserves.
Volvo Fuel Tank Parts and Q&A
- Q: How to performe Routine Maintenance on the Fuel Tank on Volvo 244?A:At the specified intervals for Routine Maintenance, the fuel level sender unit must be removed from the fuel tank, and the attached filter should be cleaned. To begin, disconnect the battery earth terminal and lift the mat in the boot. Next, remove the cover plate, disconnect the earth wire, and detach the lead from the sender unit terminal. A tool can be made to engage with the sender unit cover plate cut-outs, allowing it to be turned in an anticlockwise direction for removal. When refitting, the process is the reverse of removal, and it is essential to always fit a new gasket. Additionally, the tank must be removed.
- Q: What steps should be taken before removing a fuel tank to ensure safety and proper handling on Volvo V40?A:Before removing the tank, it must be drained of as much fuel as possible to avoid dangers associated with fuel handling and storage, ideally leaving it almost empty. Any remaining fuel can be drained using a hand-pump or siphon through the filler neck, or by jacking up the rear of the car and placing a large-capacity container under the fuel filter. Clean the fuel inlet quick-release coupling on the filter, disconnect it while being prepared for an initial release of fuel under pressure, and allow the fuel to drain into the container, removing the fuel filler cap to improve flow. Disconnect the battery negative lead, the filler pipe, and breather hose from the fuel tank, as well as the fuel supply and return pipes from the fuel filter cartridge. Remove the securing screws and detach the heat shields from the front of the tank, then position a trolley jack under the center of the tank with a protective wooden pad, raising it just enough to take the weight. Undo the nuts to release the front edges of the tank retaining straps, lower the jack slightly, disconnect the vent hoses, and detach the wiring harness from the top of the tank before lowering and removing the tank from under the car. If the tank is contaminated, remove the gauge sender unit and fuel pump, disconnect the ventilation hoses and filler tube, and swill the tank out with clean fuel. If a new tank is to be fitted, transfer all components from the old tank, renewing the filler tube seal and securing nut. For refitting, locate the tank in position, tighten the rear strap mountings, center the fuel pump plastic nut, lubricate the filler neck seals, and ensure proper placement of the drain tube. Finally, refill the tank with fuel and check for any signs of leakage before driving.


Related Volvo Parts
 Volvo Air Filter
 Volvo Fuel Pump Relay
 Volvo Fuel Sending Unit
 Volvo Intake Manifold Gasket
 Volvo MAP Sensor
 Volvo Air Filter Box
 Volvo Fuel Hose Clamps
 Volvo Fuel Pump Driver Module
 Volvo Fuel Tank Skid Plate
 Volvo Shut Off Valve
 Volvo Throttle Body Mounting Gasket
 Volvo Throttle Cable
Browse by Model
240 Fuel Tank 244 Fuel Tank 245 Fuel Tank 740 Fuel Tank 760 Fuel Tank 780 Fuel Tank 850 Fuel Tank 940 Fuel Tank 960 Fuel Tank C30 Fuel Tank C70 Fuel Tank S40 Fuel Tank S60 Cross Country Fuel Tank S60 Fuel Tank S70 Fuel Tank S80 Fuel Tank S90 Fuel Tank V40 Fuel Tank V50 Fuel Tank V60 Cross Country Fuel Tank V60 Fuel Tank V70 Fuel Tank V90 Cross Country Fuel Tank V90 Fuel Tank XC40 Fuel Tank XC40 Recharge Fuel Tank XC60 Fuel Tank XC70 Fuel Tank XC90 Fuel Tank