×
- Hello
- Login or Register
- Quick Links
- Live Chat
- Track Order
- Parts Availability
- RMA
- Help Center
- Contact Us
- Shop for
- Volvo Parts
My Garage
My Account
Cart
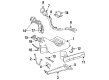
Genuine Volvo 740 Fuel Tank
Gas Tank- Select Vehicle by Model
- Select Vehicle by VIN
Select Vehicle by Model
orMake
Model
Year
Select Vehicle by VIN
For the most accurate results, select vehicle by your VIN (Vehicle Identification Number).
2 Fuel Tanks found

Volvo 740 Fuel Tank Part Number: 3507095
$225.84 MSRP: $268.86You Save: $43.02 (16%)Ships in 1-2 Business Days
Volvo 740 Fuel Tank Part Number: 1325868
$288.91 MSRP: $343.94You Save: $55.03 (16%)Ships in 1-2 Business Days
Volvo 740 Fuel Tank
The Volvo 740 Fuel Tank provides reliable storage and supply of gasoline to ensure that the engine gets the fuel it requires. The Fuel Tank is positioned beneath the back of the car, but it is not only the place that holds the liquid; there is also the electric fuel pump and the sender that sends information to the dash gauge. The Volvo tanks have baffles that prevent fuel from sloshing out of the pickup and out of the tank on hard turns and bumps to ensure that the pump remains submerged and the noise is kept down. The tank is also connected to the EVAP system, and it traps vapors instead of releasing them into the air. Volvo has provided two principal constructions over the years. In traditional metal tanks, the tanks begin as sheet metal stamped pieces made of steel or aluminum, which are welded together and tested in the factory. High density polyethylene is blow molded into plastic forms to achieve lower weight and resist rust. Both types are exposed to road spray, salt, and debris, but their vulnerabilities vary; metal can rust on the inside and the outside, whereas plastic can break after intense heat or cold or in case of impact. Regardless of the material, the Fuel Tank is fastened with new lock rings, seals, and supportive straps that prevent leakage. When it comes to choosing the right capacity and shape, this makes it perfect to fit all the models of the Volvo 740 series while maintaining safety and consistent fuel supply through the miles.
OEM parts are the only choice for top quality and real functionality. They pass strict checks, and they match Volvo's factory specs, so installation is easy. If you need new Fuel Tank and you want quality and fit. You will find both here. Our site has a wide range of OEM Volvo 740 parts. The prices are unbeatable, allowing you to get value for money. Each genuine 740 Fuel Tank comes with the manufacturer's warranty. That gives you peace of mind. We ship fast to your door. Order today, and enjoy a smooth, no-hassle upgrade with parts that fit right.
Volvo 740 Fuel Tank Parts and Q&A
- Q: How to handle the fuel tank when removing and installing the fuel pump and sending unit assembly on Volvo 740?A:On all vehicles, there's the fuel tank, which has the Fuel Pump and sending unit assembly. To remove and install, disconnect the negative battery cable and properly relieve the fuel system pressure. For vehicles with the 2.9L 6 cylinder engine or 2.3 and 2.4L 5 cylinder engine, tilt the rear seat forward and remove or fold back the trunk compartment carpet over the right hand wheel well panel, disconnect the fuel pump electrical connections taking note of the color markings on the hoses. Detach the quick-connect couplers for the fuel delivery and return hoses, raise and safely support the vehicle on jack stands, and fully drain the fuel tank, making sure that a dry-chemical fire extinguisher is handy in case of an explosion because of the explosive nature of fuel vapors. At the trunk, remove the panels over the filler hose and it may be necessary to remove the spare tire on some vehicles. Roll back the carpet and take off the access panel cover, disconnect the fuel filler pipe connection and take off the circlip holding the fuel filler pipe if fitted. At the fuel tank, label and disconnect all fuel lines to the tank, all electrical connectors to the tank. On some models it may be necessary to remove the driveshaft. Position a floor jack beneath the tank using a large piece of wood as a cushion, raise the jack until it just touches the tank and then remove any shields or protective covers on the tank. Loosen and remove the tank retaining bolts, lower the jack slowly and check for any obstructions. For installation, lift the fuel tank to the correct position, install and tighten attaching bolts, remove the floor jack, fasten the electrical connections making sure they are in the right position, install the protective panel in the trunk, replace the spare tire if necessary and the carpet. Finally, drop the vehicle, connect the negative battery cable, start the ignition key ON and look for the leaks.
Related Volvo 740 Parts
 Volvo 740 Air Filter
 Volvo 740 Fuel Pressure Regulator
 Volvo 740 Fuel Pump
 Volvo 740 Air Intake Hose
 Volvo 740 Fuel Cap
 Volvo 740 Fuel Filler Hose
 Volvo 740 Fuel Hose
 Volvo 740 Fuel Sending Unit
 Volvo 740 Fuel Tank Filler Neck
 Volvo 740 Fuel Tank Strap
 Volvo 740 Throttle Cable
 Volvo 740 Vapor Canister Purge Solenoid