×
- Hello
- Login or Register
- Quick Links
- Live Chat
- Track Order
- Parts Availability
- RMA
- Help Center
- Contact Us
- Shop for
- Volvo Parts
My Garage
My Account
Cart
Genuine Volvo Variable Timing Solenoid
Engine Variable Timing Solenoids- Select Vehicle by Model
- Select Vehicle by VIN
Select Vehicle by Model
orMake
Model
Year
Select Vehicle by VIN
For the most accurate results, select vehicle by your VIN (Vehicle Identification Number).
17 Variable Timing Solenoids found


Volvo Solenoid, Passenger Side Part Number: 30684282
$235.56 MSRP: $306.72You Save: $71.16 (24%)Ships in 1-2 Business DaysProduct Specifications- Other Name: VVT Solenoid; Solenoid
- Position: Passenger Side
- Replaces: 36002693
Volvo Solenoid, Driver Side Part Number: 30684283
$235.56 MSRP: $306.72You Save: $71.16 (24%)Ships in 1-2 Business DaysProduct Specifications- Other Name: VVT Oil Control Valve; VVT Solenoid; Solenoid
- Position: Driver Side
- Replaces: 36002694

Volvo Control Valve Solenoid Part Number: 31216281
$235.56 MSRP: $306.72You Save: $71.16 (24%)Ships in 1-2 Business DaysProduct Specifications- Other Name: Engine Variable Valve Timing (VVT) Solenoid; Timing Solenoid; Solenoid
- Replaces: 36002689

Volvo Control Valve Solenoid Part Number: 31251224
$235.56 MSRP: $306.72You Save: $71.16 (24%)Ships in 1-2 Business DaysProduct Specifications- Other Name: VVT Oil Control Valve Solenoid; Solenoid
- Replaces: 36002690
Volvo Solenoid, Driver Side Part Number: 8687947
$211.33 MSRP: $286.36You Save: $75.03 (27%)Ships in 1-2 Business DaysProduct Specifications- Other Name: Engine Variable Valve Timing Oil Control Valve; Solenoid
- Position: Driver Side
- Replaces: 36002691
Volvo Solenoid, Passenger Side Part Number: 8687948
$235.56 MSRP: $306.72You Save: $71.16 (24%)Ships in 1-2 Business DaysProduct Specifications- Other Name: Engine VVT Oil Control Valve; VVT Solenoid; Solenoid
- Position: Passenger Side
- Replaces: 36002692

Volvo Solenoid Part Number: 31251212
$345.48 MSRP: $449.85You Save: $104.37 (24%)Ships in 1-2 Business DaysProduct Specifications- Other Name: VVT Solenoid Kit
- Replaces: 36002696
Volvo Solenoid Part Number: 31355828
$376.88 MSRP: $490.74You Save: $113.86 (24%)Ships in 1-2 Business DaysProduct Specifications- Other Name: VVT Oil Control Valve
- Replaces: 36002145

Volvo Solenoid Part Number: 31355829
$376.88 MSRP: $490.74You Save: $113.86 (24%)Ships in 1-2 Business DaysProduct Specifications- Other Name: Engine Variable Valve Timing (VVT) Solenoid
- Replaces: 36002146

Volvo Solenoid Part Number: 31251211
$447.56 MSRP: $582.77You Save: $135.21 (24%)Ships in 1-2 Business DaysProduct Specifications- Other Name: Kit; Engine Variable Valve Timing (VVT) Solenoid
- Replaces: 36002695


Volvo Control Valve Solenoid Part Number: 31216221
$108.19 MSRP: $145.38You Save: $37.19 (26%)Ships in 1-2 Business DaysProduct Specifications- Other Name: VVT Oil Control Valve; VVT Solenoid; Solenoid
- Replaces: 36002687

Volvo Control Valve Solenoid Part Number: 31480440
$235.56 MSRP: $306.72You Save: $71.16 (24%)Ships in 1-2 Business DaysProduct Specifications- Other Name: Solenoid; Variable Timing Solenoid; Solenoid
- Replaces: 36010250, 36011258
Volvo Control Valve Solenoid Part Number: 31480441
$235.56 MSRP: $306.72You Save: $71.16 (24%)Ships in 1-2 Business DaysProduct Specifications- Other Name: Solenoid; Variable Timing Solenoid; Solenoid
- Replaces: 36011259, 36010251
Volvo Control Valve Solenoid Part Number: 32298303
$235.56 MSRP: $306.72You Save: $71.16 (24%)Ships in 1-2 Business DaysProduct Specifications- Other Name: Solenoid; Variable Timing Solenoid; Solenoid

Volvo Solenoid Part Number: 9202388
$186.30 MSRP: $221.79You Save: $35.49 (16%)Ships in 1-2 Business DaysProduct Specifications- Other Name: Engine Variable Valve Timing Oil Control Valve
- Replaces: 36002683
Volvo Control Valve Part Number: 31480174
$345.48 MSRP: $449.85You Save: $104.37 (24%)Ships in 1-2 Business DaysProduct Specifications- Other Name: Actuator; Variable Timing Solenoid; Actuator
Volvo Control Valve Solenoid Part Number: 31216222
$376.88 MSRP: $490.74You Save: $113.86 (24%)Ships in 1-2 Business DaysProduct Specifications- Other Name: VVT Oil Control Valve; VVT Solenoid; Solenoid
- Replaces: 36002688
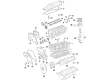
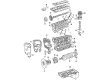
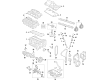
Volvo Variable Timing Solenoid
Volvo Variable Timing Solenoid allows the brand's engines to change valve timing in milliseconds, meaning that you'll get more power when you press the pedal but low fuel use during calm cruising. Volvo started building cars in 1927 and has always been on a mission to make travel safer and smarter, from the three-point seat belt to clean, easy-to-read dashboards to keep eyes on the road. The company designs cars, trucks, and buses with just as much attention to durable frames and graceful Scandinavian style, and its drive to enter the powertrain of the electric age gives promise of slashing emissions without taking the fun out of driving. This is a spirit that Volvo drivers have faith in their vehicle year after year. Every modern Volvo also provides drivers with powerful brakes, intuitive controls, and soothing cabins that help make long trips less tiring. The Variable Timing Solenoid is located close to the camshaft and supplies pressurized oil to a cam phaser which allows the control unit to move the valve lift either forward or backward on the fly, allowing the combustion to remain smooth from idle to full throttle. By eliminating wasted fuel and preventing engine knock, the Variable Timing Solenoid helps lower emissions across the entire lineup instead of on one individually identified model. Its compact size keeps engine weight down, it requires little more than clean oil for long life, and it takes less time to react than old mechanical systems so you feel that you're accelerating instantly. Combined with Volvo safety and comfort, the Variable Timing Solenoid helps to make cars that feel alive but responsible.
Trust OEM Variable Timing Solenoid for quality that holds up. These parts use top-tier materials to keep your ride running smooth. Because they match exact Volvo specs, you get a flawless fit and a hassle-free install every single time. No more fighting with parts that just won't line up. It is easy to search our massive stock of genuine Volvo options at prices you will really like. Every part comes with a real manufacturer's warranty and a simple return policy. Plus, we ship fast to get your order to you. Shop with confidence and give your Volvo the reliability it deserves.
Volvo Variable Timing Solenoid Parts and Q&A
- Q: How to remove and refit the timing belt upper covers and Variable Timing Solenoid control valve on Volvo V40?A:To remove the timing belt upper covers, you should first remove both the inner and outer covers. Around the base of the control valve, clean the area to avoid dirt or debris entering the valve ports before removal. Disconnect the wiring connector of the control valve, and then undo the four bolts for installing the valve to remove the valve, being prepared for some oil spillage. Recover the gasket from the cylinder head surface as this new one will be needed for refitting and be sure to keep any contaminated oil or dirt out of the valve block or engine ports during this process. For refitting, clean the gasket surfaces of both engine and valve and fit a new gasket. Reconnect the valve and adjust the four mounting bolts evenly to the specified torque and then reconnect the wiring plug to the valve. Check the engine oil level and top it up if necessary, and if desired run the engine before refitting the timing belt covers to check for any signs of oil leaks in order to ensure that loose clothing is kept clear of the timing belt and sprockets. Finally, reinstall the timing belt covers.
- Q: How do Cam Gear, Camshaft Seal and Variable Timing Solenoid affect the procedure for using the camshaft locking tool 999 5452 and ensuring proper valve timing during camshaft sprocket removal on Volvo V70?A:For this procedure, one needs the Volvo camshaft locking tool 999 5452, which stops the camshafts turning while the sprockets are removed, and details for a home-made alternative are given. It is important that the camshafts be locked so that valve timing is not lost. In addition it is necessary Volvo tool 999 5451. Start by removing the timing belt then remove the air cleaner assembly and intake ducts to get access to the left-hand end of both camshafts. Remove the cross-stay mounting bracket from the top of the engine, then for non-turk models remove the camshaft position sensor housing from the intake camshaft. For turbo models, eliminate the sensor housing from the exhaust camshaft and the sensor rotor plate. Next follow the instructions to remove the bracket from the cylinder head at the left hand end if fitted, and use a screwdriver to prime out the plastic blanking plug at the end of the appropriate camshaft, being prepared for oil spillage. Make sure that the slots in the camshafts are parallel to the join between the upper and lower parts of the cylinder head before locking them in place. Check the timing marks on the crankshaft sprockets and then fit the locking tool on the left-hand side of the cylinder head in such a way that it makes a firm contact with the camshaft slots. If both camshaft sprockets are going to be removed, mark them for identification. For a sprocket that has a variable valve timing unit, use a Torx 55 key to remove the plug and central retaining screw, then pull the camshaft sprocket off. For a sprocket that has no variable valve timing, remove the three bolts and pull out the sprocket. Carefully remove the seal without damaging the sealing face of the shaft, clean the seat of the seal, and lubricate the new oil seal, and fit the oil seal. Refit the camshaft sprocket with aligned timing marks, the bolts tightened just enough to permit movement. For the variable valve timing sprocket, make sure to place the crankshaft in the right position, remove the starter motor and insert the crankshaft stop tool. Rotate the crankshaft anti-clockwise until it hits the tool and press it with the VVT unit onto the camshaft and tighten the tight screw lightly. Adjust the sprocket bolts to the middle of the slots on the VVT unit and tighten gently and turn the VVT unit clockwise to stop and slacken the retaining screw. Temporarily reattaching the timing belt cover and aligning the marks in the sprocket rim with the timing belt cover then tighten the VVT unit screw to the specified torque. Fit the new timing belt to the sprockets, slacken off the bolts holding the VVT unit and non-WT sprocket and refit the center plug to the VVT unit, and tighten it to the specified torque. Apply the appropriate torque of the camshaft sprocket bolts and check the position of the timing belt tensioner arm and adjust, if needed. Finally, remove the camshaft locking tools and crankshaft stop tool, turn the crankshaft clockwise through two full revolutions and check that all the timing marks can be realigned, this means that the tensioner pointer is aligned with the central notch, then complete the refitting process.

Related Volvo Parts
 Volvo Timing Belt
 Volvo Crankshaft
 Volvo Oil Filter Housing
 Volvo Oil Pump
 Volvo Valve Cover
 Volvo Cam Gear
 Volvo Crankshaft Thrust Washer Set
 Volvo Crankshaft Timing Gear
 Volvo Rod Bearing
 Volvo Timing Chain Guide
 Volvo Timing Cover Gasket
 Volvo Valve Lifter
Browse by Model
C30 Variable Timing Solenoid S40 Variable Timing Solenoid S60 Cross Country Variable Timing Solenoid S60 Variable Timing Solenoid S80 Variable Timing Solenoid S90 Variable Timing Solenoid V40 Variable Timing Solenoid V60 Cross Country Variable Timing Solenoid V60 Variable Timing Solenoid V70 Variable Timing Solenoid V90 Cross Country Variable Timing Solenoid V90 Variable Timing Solenoid XC40 Variable Timing Solenoid XC60 Variable Timing Solenoid XC70 Variable Timing Solenoid XC90 Variable Timing Solenoid