×
- Hello
- Login or Register
- Quick Links
- Live Chat
- Track Order
- Parts Availability
- RMA
- Help Center
- Contact Us
- Shop for
- Volvo Parts
My Garage
My Account
Cart
Genuine Volvo Harmonic Balancer
Engine Harmonic Balancer- Select Vehicle by Model
- Select Vehicle by VIN
Select Vehicle by Model
orMake
Model
Year
Select Vehicle by VIN
For the most accurate results, select vehicle by your VIN (Vehicle Identification Number).
21 Harmonic Balancers found

Volvo Crank Pulley Part Number: 31316803
$299.42 MSRP: $453.68You Save: $154.26 (34%)Ships in 1-2 Business DaysProduct Specifications- Other Name: Alternator Decoupler Pulley; Harmonic Balancer; Pulley

Volvo Vibration Damper Part Number: 31359414
$306.23 MSRP: $398.74You Save: $92.51 (24%)Ships in 1-2 Business DaysProduct Specifications- Other Name: Oscillation Damper; Harmonic Balancer

Volvo Vibration Damper Part Number: 1275369
$132.07 MSRP: $155.93You Save: $23.86 (16%)Ships in 1-2 Business DaysProduct Specifications- Other Name: Pulley; Harmonic Balancer

Volvo Vibration Damper Part Number: 30731038
$216.80 MSRP: $258.10You Save: $41.30 (16%)Ships in 1-2 Business DaysProduct Specifications- Other Name: Oscillation Damper; Harmonic Balancer


Volvo Vibration Damper Part Number: 30731045
$345.48 MSRP: $449.85You Save: $104.37 (24%)Ships in 1-2 Business DaysProduct Specifications- Other Name: Oscillation Damper; Harmonic Balancer


Volvo Vibration Damper Part Number: 30757567
$345.48 MSRP: $449.85You Save: $104.37 (24%)Ships in 1-2 Business DaysProduct Specifications- Other Name: Oscillation Damper; Harmonic Balancer

Volvo Vibration Damper Part Number: 30777689
$345.48 MSRP: $449.85You Save: $104.37 (24%)Ships in 1-2 Business DaysProduct Specifications- Other Name: Oscillation Damper; Engine Harmonic Balancer; Pulley


Volvo Vibration Damper Part Number: 31401194
$345.48 MSRP: $449.85You Save: $104.37 (24%)Ships in 1-2 Business DaysProduct Specifications- Other Name: Oscillation Damper; Harmonic Balancer


Volvo Vibration Damper Part Number: 31401195
$345.48 MSRP: $449.85You Save: $104.37 (24%)Ships in 1-2 Business DaysProduct Specifications- Other Name: Oscillation Damper; Harmonic Balancer

Volvo Vibration Damper Part Number: 32380012
$416.16 MSRP: $541.87You Save: $125.71 (24%)Ships in 1-2 Business DaysProduct Specifications- Other Name: Oscillation Damper; Harmonic Balancer
- Replaces: 32253160


Volvo Vibration Damper Part Number: 30731039
$588.90 MSRP: $766.79You Save: $177.89 (24%)Ships in 1-2 Business DaysProduct Specifications- Other Name: Oscillation Damper; Harmonic Balancer

Volvo Vibration Damper Part Number: 31104839
$427.96 MSRP: $509.47You Save: $81.51 (16%)Ships in 1-2 Business DaysProduct Specifications- Other Name: Oscillation Damper; Harmonic Balancer


Volvo Crankshaft Pulley, Outer Part Number: 1219092
$51.08 MSRP: $59.82You Save: $8.74 (15%)Ships in 1-2 Business DaysProduct Specifications- Other Name: Pulley, Outer; Harmonic Balancer; Crankshaft Pulley
- Position: Outer
Volvo Crankshaft Pulley, Inner Part Number: 1219091
$53.95 MSRP: $63.17You Save: $9.22 (15%)Ships in 1-2 Business DaysProduct Specifications- Other Name: Pulley, Inner; Harmonic Balancer; Crankshaft Pulley
- Position: Inner
Volvo Crankshaft Pulley Part Number: 1336647
$83.10 MSRP: $98.12You Save: $15.02 (16%)Ships in 1-2 Business DaysProduct Specifications- Other Name: Pulley; Harmonic Balancer; Pulley
Volvo Crankshaft Pulley Part Number: 1271443
$221.32 MSRP: $263.47You Save: $42.15 (16%)Ships in 1-2 Business DaysProduct Specifications- Other Name: Pulley; Harmonic Balancer; Pulley
Volvo Crankshaft Pulley Part Number: 9135195
$240.50 MSRP: $286.32You Save: $45.82 (16%)Ships in 1-2 Business DaysProduct Specifications- Other Name: Oscillation Damper;Crankshaft Pulley;Harmonic Balancer; Vibration Damper
Volvo Crankshaft Pulley Part Number: 1328329
$412.57 MSRP: $533.04You Save: $120.47 (23%)Ships in 1-2 Business DaysProduct Specifications- Other Name: Oscillation Damper; Harmonic Balancer; Pulley

Volvo Vibration Damper Part Number: 1275801
Product Specifications- Other Name: Harmonic Balancer; Engine Crankshaft Pulley
Volvo Vibration Damper Part Number: 30720149
$237.12 MSRP: $282.29You Save: $45.17 (16%)Product Specifications- Other Name: Oscillation Damper; Harmonic Balancer
| Page 1 of 2 |Next >
1-20 of 21 Results
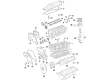
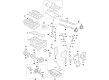
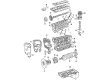
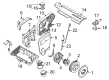
Volvo Harmonic Balancer
Volvo Harmonic Balancer is responsible for keeping the crankshaft steady by absorbing torsional vibration and keeps every engine running more smoothly and longer, a simple part of the engine that protects power components and ensures against costly damage. Volvo is known throughout the world for placing people first, from pioneering the three-point seat belt to equipping all vehicles with responsive brakes and easy-to-read instrumentation to foster confident control. Drivers of Volvo vehicles enjoy the way the simple, yet strong construction gives peace of mind. Today Volvo invests heavily in electric powertrains and plug-in hybrid testing, proving that safety and sustainability can go hand in hand without losing performance. Such is the forward thinking that owners trust mile after mile of a reputation for durability. The Harmonic Balancer complements this philosophy by introducing an invisible layer of protection in the engine bay. Built with a sturdy steel hub, an inertia ring, and a resilient rubber layer, the Harmonic Balancer mounts on the crankshaft, slightly lags each power pulse, cancelling twist, which can crack metal, loosen pulleys, or shake fasteners. Because component belts ride directly on its outer ring, a healthy Harmonic Balancer also maintains the smooth spinning of the alternator, water pump, and cooling fan that supports quiet operation across the entire Volvo lineup.
Trust OEM Harmonic Balancer for quality that holds up. These parts use top-tier materials to keep your ride running smooth. Because they match exact Volvo specs, you get a flawless fit and a hassle-free install every single time. No more fighting with parts that just won't line up. It is easy to search our massive stock of genuine Volvo options at prices you will really like. Every part comes with a real manufacturer's warranty and a simple return policy. Plus, we ship fast to get your order to you. Shop with confidence and give your Volvo the reliability it deserves.
Volvo Harmonic Balancer Parts and Q&A
- Q: How to remove and install a Harmonic Balancer on Volvo 740?A:To remove and install components for a variety of engine types, disconnect a negative battery cable first. For the 2.3L 4 cylinder engine, remove the drive belts, cooling fan, cooling fan shroud, center nut on the damper, and the damper from the crankshaft. To install, place the damper back on the crankshaft, tighten the center nut to 44 ft. lbs. and then 60 degrees more, before reinstalling the cooling fan shroud, drive belts and cooling fan before reconnecting the negative battery cable. For 2.8L 6-cylinder engine After disconnecting the battery Remove drive belt(s) Cooling fan Raise the vehicle Take off the splashguard Remove the starter and use a special tool to prohibit the turning of the crankshaft, then remove center nut and pulley on the crankshaft being careful of the aligning key. To install, align the pulley on the crankshaft, tighten the center nut to 177-207 ft. lbs., reinstall the starter and splashguard, lower the vehicle and reconnect the battery. For 2.9L 6-cylinder engine, go through similar first steps, then unbolt the 4 bolts of the vibration damper, use a tool to secure the damper, and take off the middle nut and damper. When installing, put the damper back, tighten the center nut to 221 ft. lbs., reinstall the damper bolts, cooling fan, and drive belts, than lower the vehicle and reconnect the battery. For these 2.3L and 2.4L 5-cylinder engines disconnect the battery, raise the vehicle, and get inside the engine by bending backward the fenderwell trim. Remove the drive belt and damper bolts, use a tool to hold the damper and remove the center nut and damper. To install, install the damper back, put the center nut back and tighten to 133 ft. lbs. and install the damper bolts, drive belt, fenderwell trim, lower vehicle, reconnect battery.
- Q: How to remove and refit the harmonic balancer on the auxiliary drivebelt for 1.6 litre diesel engine on Volvo S40?A:To remove the auxiliary drivebelt, first, lock the harmonic balancer by putting Volvo tool No 999 7169 in the hole in the right hand face of the engine block over the lower section of the flywheel, turn the harmonic balancer till the tool is locked with the corresponding hole in the flywheel. If the Volvo tool is not available, a 12mm rod or drill can be put inside the hole to prevent it from rotating. Next, with the help of an appropriate socket and extension bar, unscrew the retaining bolt, remove the washer and slide the harmonic balancer off the crankshaft. If the harmonic balancer is a tight fit, a suitable puller can be used, and it has to be made sure that the retaining bolt is refitted without the washer, to prevent damaging the crankshaft. For refitting, put the harmonic balancer back in place on the crankshaft, clean the threads of the retaining bolt, and put a coat of locking compound on it. Refit the retaining bolt and washer, tightening it to the specified torque and angle and preventing the crankshaft from turning. Finally, refit and tension the auxiliary drivebelt.

Related Volvo Parts
 Volvo Timing Belt
 Volvo Crankshaft
 Volvo Valve Cover Gasket
 Volvo Camshaft Bearing
 Volvo Camshaft Seal
 Volvo Crankshaft Timing Gear
 Volvo Oil Dipstick Tube
 Volvo Piston Ring
 Volvo Timing Cover
 Volvo Valve Lifter
 Volvo Valve Spring
 Volvo Valve Spring Retainer
Browse by Model
240 Harmonic Balancer 244 Harmonic Balancer 245 Harmonic Balancer 740 Harmonic Balancer 760 Harmonic Balancer 780 Harmonic Balancer 850 Harmonic Balancer 940 Harmonic Balancer C30 Harmonic Balancer C70 Harmonic Balancer S40 Harmonic Balancer S60 Cross Country Harmonic Balancer S60 Harmonic Balancer S70 Harmonic Balancer S80 Harmonic Balancer S90 Harmonic Balancer V40 Harmonic Balancer V50 Harmonic Balancer V60 Cross Country Harmonic Balancer V60 Harmonic Balancer V70 Harmonic Balancer V90 Cross Country Harmonic Balancer V90 Harmonic Balancer XC40 Harmonic Balancer XC60 Harmonic Balancer XC70 Harmonic Balancer XC90 Harmonic Balancer