×
- Hello
- Login or Register
- Quick Links
- Live Chat
- Track Order
- Parts Availability
- RMA
- Help Center
- Contact Us
- Shop for
- Volvo Parts
My Garage
My Account
Cart
Genuine Volvo Antenna
Radio Antenna- Select Vehicle by Model
- Select Vehicle by VIN
Select Vehicle by Model
orMake
Model
Year
Select Vehicle by VIN
For the most accurate results, select vehicle by your VIN (Vehicle Identification Number).
28 Antennas found

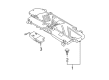
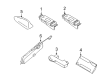
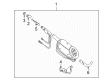
Volvo Antenna Assembly Part Number: 31260503
$14.35 MSRP: $16.80You Save: $2.45 (15%)Ships in 1-2 Business DaysProduct Specifications- Other Name: Antenna Retainer; Antenna

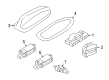
Volvo Antenna Part Number: 30710064
$23.16 MSRP: $29.66You Save: $6.50 (22%)Ships in 1-2 Business DaysProduct Specifications- Replaced by: 31268484
Volvo Antenna Part Number: 31268484
$23.16 MSRP: $29.66You Save: $6.50 (22%)Ships in 1-2 Business DaysProduct Specifications- Replaces: 30710064

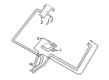
Volvo Antenna Part Number: 31450900
$23.16 MSRP: $29.66You Save: $6.50 (22%)Ships in 1-2 Business Days

Volvo Antenna Part Number: 31346697
$23.16 MSRP: $29.66You Save: $6.50 (22%)Ships in 1-2 Business Days
Volvo Antenna Part Number: 30667811
$51.09 MSRP: $65.43You Save: $14.34 (22%)Ships in 1-2 Business Days
Volvo Antenna Part Number: 30710674
$51.09 MSRP: $65.43You Save: $14.34 (22%)Ships in 1-2 Business Days

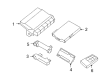
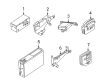
Volvo Gps Antenna Part Number: 31667590
$51.09 MSRP: $65.43You Save: $14.34 (22%)Ships in 1-2 Business DaysProduct Specifications- Other Name: Antenna; Satellite Ant
- Replaces: 31409874

Volvo Gps Antenna Part Number: 31667592
$51.09 MSRP: $65.43You Save: $14.34 (22%)Ships in 1-2 Business DaysProduct Specifications- Other Name: Antenna
- Replaces: 31346638, 31409876

Volvo Antenna Part Number: 31346764
$117.18 MSRP: $151.32You Save: $34.14 (23%)Ships in 1-2 Business DaysVolvo Antenna Part Number: 31346765
$117.18 MSRP: $151.32You Save: $34.14 (23%)Ships in 1-2 Business DaysVolvo Antenna Part Number: 31438104
$117.18 MSRP: $151.32You Save: $34.14 (23%)Ships in 1-2 Business Days

Volvo Gps Antenna Part Number: 30679889
$115.00 MSRP: $135.77You Save: $20.77 (16%)Ships in 1-2 Business DaysProduct Specifications- Other Name: Antenna

Volvo Antenna Part Number: 274154
$142.54 MSRP: $182.64You Save: $40.10 (22%)Ships in 1-2 Business Days

Volvo Gps Antenna Part Number: 31260607
$91.09 MSRP: $107.54You Save: $16.45 (16%)Ships in 1-2 Business DaysProduct Specifications- Other Name: Antenna; Satellite Ant

Volvo Antenna Assembly Part Number: 8697947
$170.78 MSRP: $201.63You Save: $30.85 (16%)Ships in 1-2 Business DaysProduct Specifications- Other Name: Antenna

Volvo Gps Antenna Part Number: 8622283
$93.35 MSRP: $110.22You Save: $16.87 (16%)Ships in 1-2 Business DaysProduct Specifications- Other Name: Antenna; Antenna Assembly

Volvo Antenna Part Number: 31438105
$235.56 MSRP: $306.72You Save: $71.16 (24%)Ships in 1-2 Business DaysProduct Specifications- Replaces: 31346769
Volvo Gps Antenna Part Number: 31409875
$235.56 MSRP: $306.72You Save: $71.16 (24%)Ships in 1-2 Business DaysProduct Specifications- Other Name: Antenna; Satellite Ant

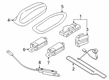
Volvo Antenna Assembly Part Number: 30889667
$182.92 MSRP: $217.76You Save: $34.84 (16%)Product Specifications- Other Name: Antenna
| Page 1 of 2 |Next >
1-20 of 28 Results
Volvo Antenna
Volvo Antenna provides sharp radio reception because it captures and amplifies the signals so that every journey is entertaining. Volvo has earned trust for almost a century with its unshakable commitment to safety, introducing the three-point seat belt, robust braking, intuitive instrumentation, and a clean Scandinavian design, which makes controls simple and distractions minimal. The brand also pushes sustainable mobility, investing in electric powertrains and testing plug-in hybrids that cut emissions without dulling performance. These qualities demonstrate how Volvo balances the need for protection, comfort, and environmental responsibility, giving drivers confidence in driving on city streets or remote highways. Complementing these vehicle strengths, the Antenna plays an important role in the entire lineup. Housed in a skinny internal strip, short exterior mast, or compact rooftop pod, each Antenna picks up AM, FM, and satellite signals then feeds them to an integrated amplifier that enables the sound to remain clear when the car is far from urban towers. This Antenna hardware is weather-resistant and vibration-resistant so it thrives on the icy roads of Sweden as well as the scorching desert routes, and because there are no bulky masts to break, it lessens breakage risks during washing or parking in the garage on a daily basis. The result is uninterrupted entertainment on par with Volvo engineering quality, where the cabin does not lose its liveliness while the driver benefits from the renowned calm of a Volvo ride.
Trust OEM Antenna for quality that holds up. These parts use top-tier materials to keep your ride running smooth. Because they match exact Volvo specs, you get a flawless fit and a hassle-free install every single time. No more fighting with parts that just won't line up. It is easy to search our massive stock of genuine Volvo options at prices you will really like. Every part comes with a real manufacturer's warranty and a simple return policy. Plus, we ship fast to get your order to you. Shop with confidence and give your Volvo the reliability it deserves.
Volvo Antenna Parts and Q&A
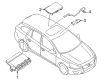
- Q: How to remove and refit the antenna on Volvo V40?A:For saloon models, start by opening the boot lid, removing the retaining screws, and removing the luggage compartment floor panel. Next, strip the boot lid sealing strip away from the left hand side and base of the boot lid aperture then carefully unclip and remove the luggage compartment rear trim panel. Remove the fasteners on the left-hand side trim panel by loosening the center screws and pulling out the entire fastener, and then fold the back of the trim panel inwards to reach the aerial. To have better access, remove the front fasteners behind the rear seat back and remove the panel altogether. Disconnect the aerial lead and undo the retaining bolt fixing the aerial earth lead to the body. Trace the drain tube back from the bottom of the aerial and release its sealing grommet from the body. Slacken and remove the mounting bolt, and then disconnect the wiring connector from the aerial. Free the top end of the aerial from the sealing grommet and remove it from the car, also remove the sealing grommet from the body and store it with the aerial. Refitting is undertaken in reverse order and ensures the sealing grommet is correctly fitted and that the aerial mounting lug is correctly located in its slot in the body. For estate models, use a small flat-bladed screwdriver to carefully prise the rear courtesy light unit out from the headlining to get access to the base of the aerial. Unclip the connectors from the roof, and then disconnect both the aerial lead and wiring connector, being careful not to allow the vehicle end of the lead/wiring to disappear behind the roof lining. Unscrew the retaining nut and remove the aerial from the roof and note the rubber seal. Refitting the order is backwards so that the rubber seal is in good condition.
- Q: How to remove and refit the antenna and its components on Volvo V70?A:To remove the bumper-mounted aerial, first, remove the rear bumper and the right-hand side trim panel in the luggage compartment. Disconnect the aerial wiring plug and then release the two clips to remove the aerial. For the bumper aerial amplifier, access it by removing the right hand side luggage compartment trim panel, then undo the one retaining screw and disconnect the wiring plug as you remove the amplifier. In S80 models the main aerial may be a wire filament built in to the right-hand side of the rear window glass, to access it remove the C-pillar trim. This aerial works with a signal booster which is actually located behind the trim panel near the rear window. Small breaks in the glass filament can sometimes be repaired with special metallic repair paste but is best done by a specialist for the best results. Refitting is the process of undoing the removal steps.


Related Volvo Parts
 Volvo Car Key
 Volvo Engine Control Module
 Volvo Instrument Cluster
 Volvo Fuse Box
 Volvo Parking Sensors
 Volvo Cooling Fan Resistors
 Volvo Cruise Control Module
 Volvo Hazard Warning Switches
 Volvo Ignition Control Module
 Volvo Relay Boxes
 Volvo Ride Height Sensor
 Volvo Seat Heater Pad
Browse by Model
240 Antenna 244 Antenna 245 Antenna 740 Antenna 760 Antenna 850 Antenna C30 Antenna C40 Recharge Antenna C70 Antenna S40 Antenna S60 Antenna S60 Cross Country Antenna S70 Antenna S80 Antenna S90 Antenna V40 Antenna V50 Antenna V60 Antenna V60 Cross Country Antenna V70 Antenna V90 Antenna V90 Cross Country Antenna XC40 Antenna XC40 Recharge Antenna XC60 Antenna XC70 Antenna XC90 Antenna