×
- Hello
- Login or Register
- Quick Links
- Live Chat
- Track Order
- Parts Availability
- RMA
- Help Center
- Contact Us
- Shop for
- Volvo Parts
My Garage
My Account
Cart
Genuine Volvo 960 Control Arm
Suspension Arm- Select Vehicle by Model
- Select Vehicle by VIN
Select Vehicle by Model
orMake
Model
Year
Select Vehicle by VIN
For the most accurate results, select vehicle by your VIN (Vehicle Identification Number).
8 Control Arms found

Volvo 960 Lower Control Arm, Passenger Side Part Number: 9140589
$100.20 MSRP: $118.30You Save: $18.10 (16%)Ships in 1-2 Business Days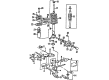
Volvo 960 Control Arm, Driver Side Part Number: 1387682
$149.14 MSRP: $176.09You Save: $26.95 (16%)Ships in 1-2 Business Days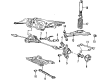
Volvo 960 Lower Control Arm Part Number: 3530450
$178.75 MSRP: $211.04You Save: $32.29 (16%)Ships in 1-2 Business Days
Volvo 960 Control Arm, Passenger Side Part Number: 1387207
$376.43 MSRP: $486.34You Save: $109.91 (23%)Ships in 1-2 Business Days
Volvo 960 Support Arm, Driver Side Part Number: 3530912
$435.37 MSRP: $562.49You Save: $127.12 (23%)Ships in 1-2 Business DaysVolvo 960 Lower Control Arm, Driver Side Part Number: 9140588
$94.94 MSRP: $112.09You Save: $17.15 (16%)Ships in 1-2 Business Days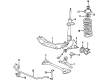
Volvo 960 Control Arm, Driver Side Part Number: 274451
Volvo 960 Control Arm, Passenger Side Part Number: 274452
Volvo 960 Control Arm
OEM parts are the only choice for top quality and real functionality. They pass strict checks, and they match Volvo's factory specs, so installation is easy. If you need new Control Arm and you want quality and fit. You will find both here. Our site has a wide range of OEM Volvo 960 parts. The prices are unbeatable, allowing you to get value for money. Each genuine 960 Control Arm comes with the manufacturer's warranty. That gives you peace of mind. We ship fast to your door. Order today, and enjoy a smooth, no-hassle upgrade with parts that fit right.
Volvo 960 Control Arm Parts and Q&A
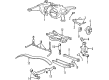
- Q: How to remove and install components on a upper Control Arm on Volvo 960?A:To remove and install components on a 1992-94 960 Sedan, first start by safely lifting and supporting the vehicle, making sure that front supports are as far forward as possible. Remove the wheels, then remove the brake caliper without disconnecting the brake hose and secure it with wire out of the way. Remove the bolt that connects the lower support arm on to the wheel bearing housing and tap it loose, followed by the nut and bolt for the lower control arm. Disconnect the track rod from the wheel bearing housing by using a small bearing puller, remove the nut that holds the upper control arm to the housing, making note of the alignment shims for reinstallation. Remove the rear upper control arm from the rear axle member and the front nut and bolt securing it to the rear axle member. Remove the control arm from the vehicle by using adjustable pliers. For installation, fix the arm to the rear axle member using the nut and bolt then install both the front and rear mounts. Now reinstall the spacers at the wheel bearing housing and tighten the nut. Tighten the rearmost nut at the rear axle support to 62 ft. lbs. and the front nut and bolt to 51 ft. lbs. with an additional 60 degrees of rotation. Pull out the top of the wheel bearing housing for proper alignment and tighten the upper control arm nut to 84 ft. lbs. Next, pull the wheel bearing housing inward and install the lower control arm and tighten the nut to 37 ft. lbs. plus 90 degrees of rotation. Reinstall the support arm and tighten the mount to 44 ft. lbs. plus an additional 90 degrees of rotation and install the track rod and tighten to 62 ft. lbs. Finally, reinstall the brake caliper and wheels, lower the vehicle and check the rear alignment if need be. For 1995-98 960/S90/V90 raise and support the vehicle remove the wheel and apply light pressure to the link arm with a compression tool. Disconnect the Shock Absorber from the support arm, and remove bolts on Sway Bars, and fully compress the tool. Remove the brake caliper and suspend it in a safe place, remove the upper control arm from the wheel bearing housing, by using a brass drift to tap out the bolt. Disconnect the track rod and lower control arm in a similar fashion and the wheel bearing housing will rest on the lower control arm. Remove the front and rear bolts from the upper control arm and then pull it from the rear axle beam. For installation, attach the upper control arm with new bolts, which should be tightened to 18 ft. lbs. Connect the wheel bearing housing to the upper control arm with a new nut, but do not tighten yet. Connect the support arm and lower control arm to the wheel bearing housing, the respective bolts installed without tightening. Tighten all attaching bolts and nuts in the specified sequence Tighten brake caliper and tighten bolts to 47 ft. lbs. Install shock absorber and tighten bolt to 63 ft. lbs. Release compression tool pressure Connect sway bar to support arm with new bolts without tightening Install wheels and lower vehicle.
- Q: How to properly install and replace the control arm and bushings on Volvo 960?A:On all models, fully install the control arm, bounce the suspension several times, and then tighten the control arm-to-crossmember mounting nuts or bolts. For the 240 Series, raise the vehicle and support it safely, remove the wheel(s), disconnect the stabilizer link at the control arm, remove the control arm from the Ball Joint, remove the rear attachment plate, and the front retaining bolt before taking out the control arm. If bushings are to be replaced, note that the right and left bushings are not interchangeable, with the right side bushing turned so that the small slots point horizontally when installed. Install the bracket onto the control arm, ensuring the nut is tightened just enough to hold securely, then attach the control arm, install the front retaining bolt and nut, and guide the stabilizer link into position. Install the ball joint and its mount, tighten the three mounting bolts to specification, install the rear bracket to the vehicle, and tighten the three bolts to 25-35 ft. lbs. (34-48 Nm). Tighten the stabilizer link, install the wheel(s), lower the vehicle, jounce the front of the vehicle up and down to normalize the front suspension, and tighten the rear mount nut to 38-44 ft. lbs. (52-60 Nm) and the front mount to 55 ft. lbs. (75 Nm). For the 700, 900, S90, and V90 Series, raise the vehicle and support it safely, remove the wheel(s), remove the cotter pin and ball joint nut, disconnect the stabilizer link, disconnect the strut bolt, and remove the front bushing. Use a ball joint puller to separate the ball joint from the control arm, unbolt the control arm at the crossmember, and remove the arm. If bushings are to be replaced, use a press to support the arm from below and press in new bushings from the front side. Fit the control arm over the end of the strut rod, install it in the crossmember without fully tightening the nut, install the ball joint, tighten the nut to 44 ft. lbs. (60 Nm), install a new cotter pin, and tighten the strut rod bolt to 70 ft. lbs. (95 Nm). Attach the stabilizer link and tighten it to 63 ft. lbs. (86 Nm), install the wheel(s), lower the vehicle, and jounce the front of the vehicle before tightening the control arm-to-crossmember bolt to 63 ft. lbs. (86 Nm). For the 850, C70, S70, and V70 Series, raise and safely support the vehicle, remove the through-bolt securing the ball joint to the spindle, remove the ball joint from the spindle, and remove the bolts and nuts holding the lower control arm to the frame before removing the lower control arm. Clean the ball joint and subframe where the lower control arm mates, install the lower control arm in the frame with new bolts and nuts, tighten the lower control arm subframe bolts to 48 ft. lbs. (65 Nm) and then angle tighten 120°, apply rustproofing compound to the lower control arm nuts, connect the ball joint to the spindle, and tighten the bolt to 13 ft. lbs. (18 Nm) before lowering the vehicle. For control arm bushing replacement in the 240 Series, raise the vehicle and support it safely, mark the position of the wheel stud nearest to the valve, disconnect the stabilizer link, remove the lower control arm, remove the rear bracket, and drive out the old bushings. When replacing the bushings, ensure the right side bushing is turned so that the small slots point horizontally when installed, install the new bushings onto the control arm, install the bracket, and then install the control arm and stabilizer link before installing the wheel and lowering the vehicle. For the 700, 900, S90, and V90 models, raise and safely support the vehicle, mark the position of the wheel stud nearest to the valve, remove the lower control arm, press out the bushing with a suitable drift, press in the new bushing with a suitable drift using disc 5240 or equivalent as support, install the control arm, install the wheel, and lower the vehicle. For the 850, C70, S70, and V70 Series, raise and safely support the vehicle, remove the wheel(s), remove the control arm, clean the bushing outer sleeves, press out the bushings using tools 5481 and 5482 or equivalent, press in the new bushings using the same tools, install the control arm, install the wheel(s), and lower the vehicle.
Related Volvo 960 Parts
 Volvo 960 ABS Reluctor Ring
 Volvo 960 Axle Beam Mount
 Volvo 960 Axle Support Bushings
 Volvo 960 Camber and Alignment Kit
 Volvo 960 Coil Spring Insulator
 Volvo 960 Shock Absorber
 Volvo 960 Shock And Strut Mount
 Volvo 960 Steering Knuckle Bushing
 Volvo 960 Strut Bearing
 Volvo 960 Sway Bar
 Volvo 960 Trailing Arm Bushing
 Volvo 960 Wheel Bearing Dust Cap