×
- Hello
- Login or Register
- Quick Links
- Live Chat
- Track Order
- Parts Availability
- RMA
- Help Center
- Contact Us
- Shop for
- Volvo Parts
My Garage
My Account
Cart
Genuine Volvo S40 Cylinder Head
Head- Select Vehicle by Model
- Select Vehicle by VIN
Select Vehicle by Model
orMake
Model
Year
Select Vehicle by VIN
For the most accurate results, select vehicle by your VIN (Vehicle Identification Number).
2 Cylinder Heads found

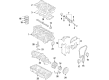
Volvo S40 Cylinder Head Part Number: 36050502
$2195.75 MSRP: $2648.13You Save: $452.38 (18%)Ships in 1-2 Business Days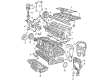
Volvo S40 Cylinder Head Part Number: 8252302
$3546.15 MSRP: $4282.98You Save: $736.83 (18%)Ships in 1-2 Business Days
Volvo S40 Cylinder Head
The essence of the Volvo S40 Cylinder Head is to close every combustion chamber and direct the fresh air-fuel in and the exhaust out to ensure that the engine breathes easily and remains cool. The head is positioned over the cylinders and is fitted with spark plugs, intake and exhaust valves, and passages of coolant that remove heat from the hot cylinder part of the motor. Current Volvo heads are made of aluminum, a light metal that conducts heat and reduces total weight, with some older cast-iron ones being available but heavier. The aluminum style gives ports the opportunity to be refigured to achieve less turbulent airflow, thus enabling the S40 to make more power without necessarily having bigger displacement. Regardless of the substance, the head has to be hard and fastened to the block, so Volvo has to use Torque-to-Yield bolts, stretching a little and evenly distributing their force, in collaboration with the head gasket to ensure that the combustion gases, oil, and coolant remain separated. Failure of the gasket can be felt by drivers as a loss of compression and misfiring, increased temperature due to loss of coolant, or the evidence given by milky oil when there is a mixture of fluids. Such other issues as burnt valves, weak springs, frayed guides, and deformed decks that promote leaks and performance cuts can also be identified as common problems. Monitoring the temperature, the color of the oil, and engine smoothness are a few of the ways to identify the problem before it happens and safeguard this important Cylinder Head. Prudent selection of materials and bolt technology allows the Volvo models of today to retain the Cylinder Head sealing in a tight manner and meanwhile provide drivers with the lively feel they expect of the S40 line.
OEM parts are the only choice for top quality and real functionality. They pass strict checks, and they match Volvo's factory specs, so installation is easy. If you need new Cylinder Head and you want quality and fit. You will find both here. Our site has a wide range of OEM Volvo S40 parts. The prices are unbeatable, allowing you to get value for money. Each genuine S40 Cylinder Head comes with the manufacturer's warranty. That gives you peace of mind. We ship fast to your door. Order today, and enjoy a smooth, no-hassle upgrade with parts that fit right.
Volvo S40 Cylinder Head Parts and Q&A
- Q: What are the steps involved in dismantling, inspecting, and reconditioning a cylinder head on Volvo S40?A:New and reconditioned cylinder heads can be obtained from cylinder head manufacturers as well as engine overhaul specialists and specialist tools are required for dismantling and inspection procedures, and new parts may be difficult to source. It may be more practical and economical for home mechanics to buy a reconditioned head rather than dismantling, examining and reconditioning the original. To dismantle, first remove the cylinder head depending on the type of engine, remove the thermostat housing, glow plugs, and other types of components that you need to remove. Tap each valve stem to release the spring and associated items and then use a deep reach valve spring compressor to expose and lift out the collets. Remove the valve spring upper seat and spring then pull the valve out of its guide. Use long-nosed pliers to remove the valve stem oil seal, and scrape off any carbon build-up around the valve guide before recovering the valve spring lower seat. Store each valve with the collets, spring and seats in labelled bags in order to remember the order. Clean all evidence of old gasket material from cylinder head surfaces of a suitable dissolving agent and a soft putty knife, ensuring to clean carbon from combustion chambers and ports, and clean the cylinder head thoroughly with solvent. Inspecting cylinder head for cracks and damage - gasket surface distortion and pitting or burning on the valve seats. If valve guides are worn, they will need to be replaced, as well as any damaged threaded holes will need to be cleaned or fitted with thread inserts. Examine each valve for wear and damage, measuring the stem diameter to see if there are any significant differences. If satisfactory, grind the valves into their seats using appropriate grinding compounds making a good gas-tight seal. Inspect valve springs for damage and measure their free length, replacing any with distortion or loss of tension, and replace valve stem oil seals regardless of condition. For reassembly, oil the valve stem, make it slide into its guide and install the spring lower seat. Use a suitable fitting sleeve or a polythene to cover the new valve stem oil seal during installation, and then install the valve spring and upper seat, and compress the spring to ensure that the collets are firmly in place. Check the collets are seated correctly, repeat for all the valves, and reassemble the other components before re-fitting the cylinder head.
- Q: How to remove and refit a cylinder head for 2.0 litre 4-cylinder diesel engine on Volvo S40?A:To remove the cylinder head, first remove the battery and unscrew the four bolts holding the battery tray, and drain the coolant. After this, remove the Camshafts, rocker arms, and hydraulic adjusters, and finally remove the four bolts to remove the bracket over the fuel filter. Lift out the filter housing (after undoing the Torx screw), remove the fuel filter bracket and refit the bolting holding the lifting bracket to the cylinder head. Remove the turbocharger/exhaust manifold, disconnect the wiring plugs, and undo the four nuts to remove the thermostat housing from the left side of the cylinder head, taking care of coolant spillage. Disconnect the wiring plug on the pressure sensor on the underside of the common fuel rail and remove the fuel rail. Undo the retaining bolt to remove the oil filler pipe support bracket and then slacken and remove the cylinder head bolts gradually and evenly, removing them as new ones will have to be fitted. Lift the cylinder head off, with help if required, and do not lay it flat on its sealing surface, as this would damage it. If the head is stuck, get careful not to damage the sealing surfaces while freeing the head. Once removed, recover the gasket for identification of the new one. Examine the old gasket for manufacturer's identification markings to determine the thickness required for the new gasket so that it matches unless new components have been fitted or the head machined. Measuring the Piston Protrusion The next step is to measure the protrusion of the piston above the cylinder head gasket surface using a dial test indicator, and record the maximum protrusion for each piston and use the highest number to determine the thickness of the gasket. Clean the mating faces of cylinder head and block thoroughly and ensure that no carbon gets into the oil and water passages and seal any openings to avoid contamination. Check for nicks or scratches on the mating surfaces and check to make sure that the bolt holes are clean and do not contain oil. When refitting, place the new gasket over the dowels which have identification holes in the front, lower the cylinder head into position, fit the new bolts and tighten them in the specified order to the correct torque. Follow the refitting procedure in the reverse order with care to reconnect all components and refill fluids if necessary before starting the engine.
Related Volvo S40 Parts
 Volvo S40 Oil Filter Housing
 Volvo S40 Timing Belt
 Volvo S40 Oil Drain Plug
 Volvo S40 Camshaft
 Volvo S40 Crankshaft
 Volvo S40 Oil Dipstick Tube
 Volvo S40 Oil Filter Gasket
 Volvo S40 Rod Bearing
 Volvo S40 Timing Cover
 Volvo S40 Valve Spring
 Volvo S40 Valve Spring Retainer
 Volvo S40 Valve Spring Retainer Keeper