×
- Hello
- Login or Register
- Quick Links
- Live Chat
- Track Order
- Parts Availability
- RMA
- Help Center
- Contact Us
- Shop for
- Volvo Parts
My Garage
My Account
Cart
Genuine Volvo S40 Exhaust Manifold
Engine Exhaust Manifold- Select Vehicle by Model
- Select Vehicle by VIN
Select Vehicle by Model
orMake
Model
Year
Select Vehicle by VIN
For the most accurate results, select vehicle by your VIN (Vehicle Identification Number).
2 Exhaust Manifolds found

Volvo S40 Exhaust Manifold Part Number: 9497861
$575.87 MSRP: $685.56You Save: $109.69 (16%)Ships in 1-2 Business Days
Volvo S40 Exhaust Manifold Part Number: 8250520
Volvo S40 Exhaust Manifold
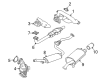
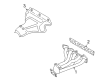
The main task of the Volvo S40 Exhaust Manifold is to collect hot gases from every cylinder and hurry them to the catalytic converter, the muffler, and the tailpipe without letting those gases enter the cabin. The Exhaust Manifold is commonly bolted directly to the engine block, taking the shape of intertwined runners, each cylinder having a tube, so that a four-cylinder one is a four-way outlet that combines to a single outlet. By directing the flow in a smooth manner, it prevents reversion of intake, the reverse puff, which deprives the motor of fresh air and fuel and robs it of power. The common units on the Volvo are made of thick cast iron or stainless steel, which are robust enough to withstand repeated heating and cooling but have a tendency to crack under stress. There have been two key styles that have emerged on the S40 line over the years. A cast lump, the traditional type, has greater durability and cost, and a header-style layout uses longer equal runners to reduce backpressure and increase exhaust gas velocity, providing more lively throttle response. Regardless of style, each Exhaust Manifold attaches to the Volvo engine using a gasket that prevents leakage of carbon monoxide and other toxic substances. Failure of the part will negatively affect performance and cabin air quality, which is why it is worth replacing it as soon as possible. The Volvo platform has small engine bays, so you can have the Exhaust Manifold on the top, up front, or even on the side according to trim level and year of manufacture.
OEM parts are the only choice for top quality and real functionality. They pass strict checks, and they match Volvo's factory specs, so installation is easy. If you need new Exhaust Manifold and you want quality and fit. You will find both here. Our site has a wide range of OEM Volvo S40 parts. The prices are unbeatable, allowing you to get value for money. Each genuine S40 Exhaust Manifold comes with the manufacturer's warranty. That gives you peace of mind. We ship fast to your door. Order today, and enjoy a smooth, no-hassle upgrade with parts that fit right.
Volvo S40 Exhaust Manifold Parts and Q&A
- Q: How to replace the Exhaust Manifold and catalytic converter on Volvo S40?A:For the 1.8 and 2.0 litre models, start by disconnecting the battery negative lead and making sure that the steering wheel is straight ahead and the steering lock is on. If the manifold gasket is the only part to be renewed, then skip the next step. Under the facia, pull up the plastic boot, mark the alignment between the steering column universal joint and steering rack pinion, then undo the pinch-bolt and pull the joint upwards. Remove the plastic cover on top of the engine, disconnect the front and rear oxygen sensor wiring plugs and undo the four bolts to remove the heat shield from the manifold. Next, undo the nuts holding the manifold to the cylinder head, removing the old nuts. Raise the front of the vehicle on axle stands, remove the two bolts holding the mounting bracket to the catalytic converter, and remove the SIPS crossmember. Disconnect the exhaust pipe from the manifold/catalytic converter, disconnect the catalytic converter from the rubber mountings and pull the manifold away from the cylinder head, discarding the gasket if not renewing it. Remove the lower torque rod and mounting bracket, make alignment marks on the front subframe and lower it slightly to maneuver the manifold/catalytic converter out. For refitting, transfer the oxygen sensors to the new manifold/catalytic converter if applicable, fit a new gasket and maneuver the assembly into place, finger tightening the new mounting nuts. Reconnect the exhaust pipe, re-install the SIPS crossmember and tighten the mounting brackets bolts. Carefully lift the front subframe in line with the marks, refitting the subframe mounting bolts to the specified torque and then the lower torque rod and mounting bracket. Finally, tighten the nuts that hold the manifold to the cylinder head to complete the process. For the 2.4 litre ones, first undo the five bolts holding the heat shield to the exhaust manifold until it is loose. Undo the nuts holding the manifold to the cylinder head, disconnect the front oxygen sensor wiring plug, and get the front of the car up on axle stands. Remove the SIPS crossmember, which loosens the rear oxygen sensor wiring harness, then disconnect the rear oxygen sensor wiring plug and undo the nuts holding the exhaust manifold to the catalytic converter. After unhooking the rubber mountings, remove the catalytic converter. If you are only renewing the gasket, pull the manifold backwards and dispose of the gasket, otherwise remove the lower torque rod and mounting bracket and lower the exhaust manifold from the vehicle. For refitting the steps include making sure the mating faces are clean, installing new gaskets, applying anti-seize grease to the manifold studs, positioning the heat shield, fitting and tightening the manifold and nuts to the indicated torque, then securely tightening the bolts of the heat shield, proceeding in reverse order of removal.

Related Volvo S40 Parts
 Volvo S40 Catalytic Converter
 Volvo S40 Air Injection Pump
 Volvo S40 Catalytic Converter Gasket
 Volvo S40 Exhaust Clamp
 Volvo S40 Exhaust Flange Gasket
 Volvo S40 Exhaust Hanger
 Volvo S40 Exhaust Heat Shield
 Volvo S40 Exhaust Manifold Gasket
 Volvo S40 Exhaust Nut
 Volvo S40 Muffler
 Volvo S40 Tail Pipe
 Volvo S40 Vapor Canister Purge Solenoid