×
- Hello
- Login or Register
- Quick Links
- Live Chat
- Track Order
- Parts Availability
- RMA
- Help Center
- Contact Us
- Shop for
- Volvo Parts
My Garage
My Account
Cart
Genuine Volvo S40 Brake Pad Set
Disc Brake Pad Set- Select Vehicle by Model
- Select Vehicle by VIN
Select Vehicle by Model
orMake
Model
Year
Select Vehicle by VIN
For the most accurate results, select vehicle by your VIN (Vehicle Identification Number).
5 Brake Pad Sets found

Volvo S40 Brake Pads Part Number: 31262468
$51.40 MSRP: $87.78You Save: $36.38 (42%)Ships in 1-2 Business Days
Volvo S40 Brake Pads, Front Part Number: 30769199
$59.68 MSRP: $101.92You Save: $42.24 (42%)Ships in 1-2 Business Days

Volvo S40 Brake Pads Part Number: 32373166
$64.23 MSRP: $110.59You Save: $46.36 (42%)Ships in 1-2 Business Days
Volvo S40 Brake Pads Part Number: 32373151
$66.53 MSRP: $114.54You Save: $48.01 (42%)Ships in 1-2 Business Days
Volvo S40 Brake Pads Part Number: 32373149
$74.51 MSRP: $128.29You Save: $53.78 (42%)Ships in 1-2 Business Days
Volvo S40 Brake Pad Set
OEM parts are the only choice for top quality and real functionality. They pass strict checks, and they match Volvo's factory specs, so installation is easy. If you need new Brake Pad Set and you want quality and fit. You will find both here. Our site has a wide range of OEM Volvo S40 parts. The prices are unbeatable, allowing you to get value for money. Each genuine S40 Brake Pad Set comes with the manufacturer's warranty. That gives you peace of mind. We ship fast to your door. Order today, and enjoy a smooth, no-hassle upgrade with parts that fit right.
Volvo S40 Brake Pad Set Parts and Q&A
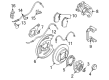
- Q: How to replace a front Brake Pad Set on Volvo S40?A:Apply the handbrake and slacken the front roadwheel nuts before jacking up the front of the vehicle and supporting it on axle stands, then remove both front roadwheels. Follow the pad renewal procedure carefully, using a flat-bladed screwdriver to prise off the caliper retaining spring, removing the rubber caps, and using an Allen key to undo the caliper guide pin bolts. Slide the caliper and pads from the disc, pulling the inner brake pad from the caliper piston; if new pads are being fitted, push the piston back into the caliper with a G-clamp or piston retraction tool while monitoring the fluid level in the master cylinder reservoir. Clean the pad mounting surfaces with a wire brush and measure the thickness of the pad's friction material, renewing all front pads if it's 2.0mm or less. Fit the outer pad to the caliper mounting bracket and the inner pad to the caliper piston, then slide the caliper with the inner pad over the disc and outer pad, holding it in place while screwing in the guide pin bolts and tightening them to the specified torque. Press the rubber caps into place over the guide pin bolts and use pliers to refit the caliper retaining spring, ensuring to remove any adhesive foil from new pads before installation, clean the caliper guide surfaces, and apply a little brake assembly grease. When pushing the caliper piston back for new pads, keep an eye on the fluid level in the reservoir. Depress the brake pedal repeatedly until the pads are firmly in contact with the Brake Disc and normal pedal pressure is restored, then repeat the procedure on the remaining front brake caliper. Refit the roadwheels, lower the vehicle to the ground, and tighten the roadwheel nuts to the specified torque before checking the hydraulic fluid level. New pads will not provide full braking efficiency until they have bedded-in, so avoid hard braking for the first hundred miles or so after renewal.
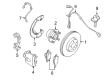
- Q: How to replace the rear Brake Pad Set on Volvo S40?A:Chock the front wheels, slacken the rear roadwheel nuts, then jack up the rear of the vehicle and support it on axle stands then remove the rear wheels. With full release of the handbrake lever follow the accompanying visuals for the pad renewal procedure, being careful to remove the caliper retaining spring using a screwdriver, as well as the rubber caps for the guide pin bolts and then unscrew them with an Allen key or Hexagon drive bit and prise out. Release the hydraulic hose from the bracket, take the caliper off the disc and take the outer pad and then the inner pad off. Measure the thickness of the friction material for the pads; if it's 2.0mm or less, renew all the rear pads. If new pads are to be fitted, use a piston retraction tool to push the piston back into the caliper while rotating it clockwise, while keeping an eye on the fluid level in the Brake Master Cylinder. Clean the pad mounting surfaces on the caliper mounting bracket with a wire brush, fit the inner pad then the outer pad, slide the caliper over the pads, hold the caliper in place, screw down the guide pin bolts and tighten them to the specified torque before fitting the guide pin rubber caps and using pliers to refit the caliper retaining spring. If re-installing the original pads, make sure they are fitted to their original positions, clean the caliper guide surfaces and guide pins thoroughly and apply a little brake assembly grease. After performing the procedure, push the brake pedal several times until the brake pads are pushed into firm engagement with the Brake Disc and the brake pedal pressure is returned to normal. Repeat the procedure on the other brake caliper, adjust the handbrake if required, re-fit the roadwheels, lower the vehicle to the ground and tighten the roadwheel nuts to the specified torque. Finally, check the level of the hydraulic fluid, bearing in mind that new pads will not deliver full braking efficiency until they have bedded-in, so hard braking for the first hundred miles or so after renewal is best avoided.


Related Volvo S40 Parts
 Volvo S40 Brake Caliper
 Volvo S40 Vacuum Pump
 Volvo S40 Wheel Hub
 Volvo S40 ABS Control Module
 Volvo S40 ABS Wheel Speed Sensor
 Volvo S40 Brake Caliper Bracket
 Volvo S40 Brake Disc
 Volvo S40 Brake Dust Shield
 Volvo S40 Brake Hose
 Volvo S40 Brake Master Cylinder Reservoir
 Volvo S40 Spindle Nut
 Volvo S40 Wheel Hub Bolt