×
- Hello
- Login or Register
- Quick Links
- Live Chat
- Track Order
- Parts Availability
- RMA
- Help Center
- Contact Us
- Shop for
- Volvo Parts
My Garage
My Account
Cart
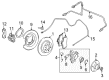
Genuine Volvo 940 Brake Pad Set
Disc Brake Pad Set- Select Vehicle by Model
- Select Vehicle by VIN
Select Vehicle by Model
orMake
Model
Year
Select Vehicle by VIN
For the most accurate results, select vehicle by your VIN (Vehicle Identification Number).
4 Brake Pad Sets found

Volvo 940 Brake Pads Part Number: 31261186
$42.50 MSRP: $72.59You Save: $30.09 (42%)Ships in 1-2 Business Days
Volvo 940 Rear Pads Part Number: 31261185
$33.77 MSRP: $57.66You Save: $23.89 (42%)Ships in 1-2 Business DaysVolvo 940 Front Pads Part Number: 270195
$76.28 MSRP: $90.06You Save: $13.78 (16%)Ships in 1-2 Business DaysVolvo 940 Front Pads Part Number: 31261182
$53.95 MSRP: $63.17You Save: $9.22 (15%)Ships in 1-2 Business Days
Volvo 940 Brake Pad Set
OEM parts are the only choice for top quality and real functionality. They pass strict checks, and they match Volvo's factory specs, so installation is easy. If you need new Brake Pad Set and you want quality and fit. You will find both here. Our site has a wide range of OEM Volvo 940 parts. The prices are unbeatable, allowing you to get value for money. Each genuine 940 Brake Pad Set comes with the manufacturer's warranty. That gives you peace of mind. We ship fast to your door. Order today, and enjoy a smooth, no-hassle upgrade with parts that fit right.
Volvo 940 Brake Pad Set Parts and Q&A
- Q: How to handle the installation and removal of a rear Brake Pad Set on Volvo 940?A:To remove and install brake components for the 240 Series with ATE caliper, raise and support the vehicle and remove the wheels. Drive out the retaining pins using 3mm punch, the retaining spring and brake pads, if the brake pads are not easy to remove, use tool 2917 or similar to compress the caliper pistons. Clean the Brake Caliper and inspect dust caps for damage and replace them if required and check for wear of the rotor, warpage or unevenness in thickness. Compress the piston into the caliper using large pliers or tool 2809, taking care to allow some fluid to escape from the master cylinder so that there is no spillage. Before installation, the piston position check, rotate the piston position 20deg from the lower part of the caliper, use tool 2919 to check whether it is the correct tolerance. Install the brake pads, retaining pins, and spring and tap the pins into place. Check brake fluid and pump the brake pedal to bleed the system if necessary and then reinstall the wheels and lower the vehicle. For the Girling caliper, the process is similar with attention paid to cleaning and inspecting components, compressing the piston and installing the pads and springs. For the 700, 900 Series, S90, and V90 models, lift the car, remove the wheels, and follow the specific procedures of independent or solid rear axles, remembering to clean the caliper and check the piston and guide pin boots. Install new pads and tighten components as specified, and check the level of brake fluid and operate the brake pedal. For the 850, S70, C70 and V70 Series, jack up the vehicle, remove the wheels and drive out the retaining pins ensuring a cleaning of the caliper surfaces and the checking of the piston dust boot and Brake Disc for damage. Push the pistons back into its housing, grease the pad shims, and install the pads and retaining components checking the brake fluid level and function before driving. The rear disc brake pads are inspected for thickness in the same way as the front brake pads.
- Q: How to remove and install a front Brake Pad Set on Volvo 940?A:To install or remove the components of brakes, one has to start by ensuring that the vehicle is securely supported and that the wheels are removed. In the case of the 240 Series, disassemble the spring clips and retaining pins, then take the retaining springs, brake pads, out, and collapse the pistons of the caliperers, should you be in need of a tool 2917. Clean up the caliper area and test the dust caps replacing them when damaged. Inspect the brake rotor (worn or warped), and squeeze the caliper pistons, remembering to control the amount of brake fluid. Research Before fitting new pads, check and replace damaged rubber dust caps and defaulter, examine the friction surface of the disc and guide pin seals. Install new parts, measure the brake fluid and press the brake pedal. In the case of 700, 900, S90 and V90, the procedure is to raise the vehicle, detach the wheels, and then lift the caliper and swing it upwards to reach the brake pads. Never press the brake pedal with no pad, and handle the levels of the brake fluid so that it does not leak out. Before reassembling, inspect the dust cap of the piston and the brake surface in order to make sure that everything is in good condition. In the 850, S70, C70 and V70 Series, repeat the process with clean up of caliper carrier, inspection of the sleeve of piston dust boot and guide pin sleeves. Once installed again, lubricate the caliper guideline, snap the guide pins in place and test the brake pedal and fluid until driving. Brake parts should always be handled carefully without breathing the dust and one should make use of proper cleaning fluids.


