×
- Hello
- Login or Register
- Quick Links
- Live Chat
- Track Order
- Parts Availability
- RMA
- Help Center
- Contact Us
- Shop for
- Volvo Parts
My Garage
My Account
Cart
Genuine Volvo S80 Drive Belt
Serpentine Belt- Select Vehicle by Model
- Select Vehicle by VIN
Select Vehicle by Model
orMake
Model
Year
Select Vehicle by VIN
For the most accurate results, select vehicle by your VIN (Vehicle Identification Number).
6 Drive Belts found

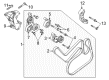
Volvo S80 Serpentine Belt Part Number: 30757007
$43.85 MSRP: $65.35You Save: $21.50 (33%)Ships in 1-2 Business Days
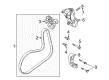
Volvo S80 Serpentine Belt Part Number: 31251046
$43.85 MSRP: $65.35You Save: $21.50 (33%)Ships in 1-2 Business Days
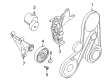
Volvo S80 Serpentine Belt Part Number: 31430015
$43.85 MSRP: $65.35You Save: $21.50 (33%)Ships in 1-2 Business Days
Volvo S80 Serpentine Belt Part Number: 8653617
$43.85 MSRP: $65.35You Save: $21.50 (33%)Ships in 1-2 Business Days
Volvo S80 Serpentine Belt Part Number: 30731808
$31.72 MSRP: $47.28You Save: $15.56 (33%)Ships in 1-2 Business Days

Volvo S80 Serpentine Belt Part Number: 9458469
Volvo S80 Drive Belt
OEM parts are the only choice for top quality and real functionality. They pass strict checks, and they match Volvo's factory specs, so installation is easy. If you need new Drive Belt and you want quality and fit. You will find both here. Our site has a wide range of OEM Volvo S80 parts. The prices are unbeatable, allowing you to get value for money. Each genuine S80 Drive Belt comes with the manufacturer's warranty. That gives you peace of mind. We ship fast to your door. Order today, and enjoy a smooth, no-hassle upgrade with parts that fit right.
Volvo S80 Drive Belt Parts and Q&A
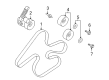
- Q: What is the process of power transmission by the auxiliary drive belt and How tot be replaced for petrol engines on Volvo S80?A:The drive belt is used to transmit power from the crankshaft pulley to the alternator, steering pump, and air conditioning compressor as applicable. Access to the lower belt run is easier via the right-hand wheel arch; loosen the right-hand front wheel bolts and jack up and support the front of the car on axle stands, remove the roadwheel, remove the two plastic nuts, remove the metal plate, and fold forwards the inner wheel arch panel to reach the crankshaft pulley. Before stripping off the old belt, record where it is fitted around all of the pulleys. The proper drive belt tension is maintained through an automatic adjuster tensioner assembly which is bolted at the front of the engine with a spring-loaded idler pulley. Use a screwdriver to prise off the plastic cap if fitted, and then use a spanner on the tensioner nut to rotate the tensioner to the back of the engine compartment, which relieves the belt tension. Slip the belt off all the pulleys, loosen the tensioner, and remove the belt. Check the tensioner and idler pulleys for any roughness or damage and renew if necessary. Fit the new belt loosely over the pulleys and the tensioner wheel, put the belt in place but leave it off the top power steering pump pulley. Rotate the tensioner to the rear and work the drive belt over the top pulley and release the tensioner; the tensioner will automatically take up the adjustment. If it was removed, refit the inner wheel arch panel and refit the wheel, and lower the car to the ground, tightening the wheel bolts to the given torque.
- Q: What is the process of power transmission by the auxiliary drive belt and How tot be replaced for diesel engines on Volvo S80?A:The drive belt carries power from the crankshaft pulley to the alternator, steering pump and air conditioning compressor as appropriate. Access to the lower belt run is easier from the right hand wheel arch, loosen the right hand front wheel bolts, jack up and support the front of the car on axle stands, remove the roadwheel, remove the two plastic nuts, remove the metal plate and fold forward the inner wheel arch panel to access the crankshaft pulley. Before removing the old belt, note where it was fitted around all pulleys. The proper drive belt tension is maintained by an automatic adjuster and tensioner assembly that is bolted to the front of the engine and contains a spring-loaded idler pulley. For D5244 T to T3 engines use a screwdriver to prise off the plastic cap if fitted and turn the tensioner clockwise with a spanner to loosen the tension on the belt and slip the belt from all the pulleys, release the tensioner and remove the belt. For D5244 T4 to T7 engines, unclip the power steering hose from the bracket, undo the 2 Torx bolts and remove the drive belt cover. Using Volvo tool No 999 7109 or a T60 Torx bit and spanner, to turn the tensioner clockwise to relieve the tension on the belt to slip the belt off all the pulleys, release the tensioner and remove the belt. For all engines check the tensioner and idler pulleys for any roughness or damage and renew where necessary. Consequently, fit the new belt loosely over the pulleys and the tensioner wheel while making sure it is in place but not over the top (power steering pump) pulley. Rotate the tensioner clockwise and work the drive belt over the top pulley and release the tensioner which will automatically take up the adjustment. If removed, reinstall the inner wheel arch panel, before reinstalling the wheel and lowering the car to the ground, by tightening the wheel bolts to the specified torque.


Related Volvo S80 Parts
 Volvo S80 Radiator
 Volvo S80 Water Pump
 Volvo S80 Coolant Level Sensor
 Volvo S80 Coolant Pipe
 Volvo S80 Cooling Fan Assembly
 Volvo S80 Cooling Fan Bracket
 Volvo S80 Cooling Fan Shroud
 Volvo S80 Engine Oil Cooler
 Volvo S80 Radiator Hose
 Volvo S80 Thermostat Gasket
 Volvo S80 Water Pump Gasket
 Volvo S80 Water Pump Pulley