×
- Hello
- Login or Register
- Quick Links
- Live Chat
- Track Order
- Parts Availability
- RMA
- Help Center
- Contact Us
- Shop for
- Volvo Parts
My Garage
My Account
Cart
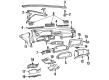
Genuine Volvo 940 Instrument Cluster
Speedometer Instrument Cluster- Select Vehicle by Model
- Select Vehicle by VIN
Select Vehicle by Model
orMake
Model
Year
Select Vehicle by VIN
For the most accurate results, select vehicle by your VIN (Vehicle Identification Number).
3 Instrument Clusters found

Volvo 940 Gauge Bezel Part Number: 6812821
$87.23 MSRP: $111.76You Save: $24.53 (22%)Ships in 1-2 Business Days
Volvo 940 Temperature Gauge Part Number: 9148541
$128.66 MSRP: $151.90You Save: $23.24 (16%)Ships in 1-2 Business DaysVolvo 940 Instrument Panel Part Number: 6848786
$611.58 MSRP: $740.42You Save: $128.84 (18%)Ships in 1-2 Business Days
Volvo 940 Instrument Cluster
Volvo 940 Instrument Cluster is a device that provides real-time information on matters such as speed, seat belt status, among other things, providing drivers with a fast overview without taking their eyes off the road. This well-organized panel is immediately behind the steering wheel, and includes the speedometer, tachometer, fuel gauge, and a row of warning lamps that illuminate to give information on the health of the car such as oil pressure, exterior lights, or a seat belt that has not been buckled. Its overall aim is not hard; maintain the driver in full cognizance of what is going on on the road by gathering the appropriate signals and converting them into readily comprehensible dials and indicator symbols. The cluster over the years has been advised by the broader dashboard development in automobiles, beginning with rugged analog needles and then adding outlines of readable graphics, added safety lamps and, in a few more years, sharp electronic displays which resonate with current demands on functionality and technology. Night driving is stress-free as many Volvo 940 drivers enjoy the clear white numerals and the use of intuitive lamps which make driving at night simple. In the model line, all 940s have identical mounting points, making it easy to change an Instrument Cluster between trim models. The form of the cluster is reminiscent of the rational safety-first philosophy that Volvo prides itself on, where all the markers are arranged in a serene symmetrical circle. It is important to periodically verify that the Instrument Cluster lights come on when the starter switch is released because the malfunction will never reach the stage of being ignored. As a safety net on the eye, a Volvo still keeps maintaining its reputation of being well-engineered besides the padded dash and standard airbags.
OEM parts are the only choice for top quality and real functionality. They pass strict checks, and they match Volvo's factory specs, so installation is easy. If you need new Instrument Cluster and you want quality and fit. You will find both here. Our site has a wide range of OEM Volvo 940 parts. The prices are unbeatable, allowing you to get value for money. Each genuine 940 Instrument Cluster comes with the manufacturer's warranty. That gives you peace of mind. We ship fast to your door. Order today, and enjoy a smooth, no-hassle upgrade with parts that fit right.
Volvo 940 Instrument Cluster Parts and Q&A
- Q: How to replace gauges in the instrument cluster, and what are the legal requirements for odometer readings during replacement on Volvo 940?A:The gauges can be replaced individually on some models, while others necessitate the replacement of the entire gauge cluster assembly, which contains various components such as modules, printed circuit boards, fuses, and sometimes small microprocessor computers for the clock and driver information center. Diagnosing this system is complex and costly, as most parts are special order only, making trial and error replacement impractical; therefore, it is advisable to diagnose the failed component before replacement. For models allowing gauge replacement, the instrument cluster should be removed, followed by the cluster cover, and then the retaining devices, which may include bolts or tabs, to take out the gauge from the cluster, with installation being the reverse of this process. In cases where the entire cluster must be replaced, the instrument cluster is removed, the printed circuit board and any necessary components are taken out, the cluster cover is removed, and the instrument cluster retainers are unfastened to extract the gauge cluster assembly. When replacing a speedometer or odometer assembly, or the instrument cluster, federal law mandates that the odometer reading of the replacement unit must match the prior odometer's mileage; if this is not possible, the replacement must be set to zero, and a proper label must be affixed to the driver's door frame indicating the previous odometer reading and the date of replacement.
- Q: How to remove and install the Instrument Cluster on Volvo 940?A:To remove and install the cluster for 240, 700 Series, 940 Models, and Coupe; first disconnect the negative battery cable, then remove the molded plastic casings from the steering column. Next, remove the bracket retaining screw and place the bracket down toward the steering column and remove the cluster attaching screws, disconnecting the speedometer cable. Tilt the cluster out of its snap fitting and disconnect the plug and if equipped with a tachometer disconnect the tachometer sending wire before lifting the cluster out of the dashboard. For installation purposes, place the cluster in the dashboard, making sure the wire and speedometer cable are reconnected before snapping it down and ensuring it snaps its connections. Install the cluster attaching screws, replace the bracket and the holding screw, install the moulded plastic casings on the steering column and reconnect the negative battery cable. For models not using 240, 700 Series and 940 Models and Coupe, start by disconnecting the negative battery cable and opening the glove compartment. Disconnect the swing-down arms from the glove compartment door, remove the screws to the lining, and disconnect the passenger side air bag module. Remove the screws over the glove compartment and under the air bag module, as well as over the instrument cluster and remove the panel vents and side demister vents. Remove the retaining screws behind the vents, the dash speaker grilles and speakers, followed by the dash panel retaining screws under each speaker grille. Remove the instrument panel cover using the attached passenger side air bag module, remove the holding clips on the instrument cluster, lift it from the dashboard and remove connectors attached at the back of the instrument cluster to remove the instrument cluster. For installation, replace any light bulbs in the instrument cluster by twisting the light bulb counterclockwise to remove and clockwise to put the new light bulb. Connectors on the back of the cluster assembly are connected, inserted and retaining clips are connected. Then place the instrument panel cover and install the retaining screws, then the vents, dash speakers and grilles. Install air bag module retaining screws, plug in air bag module connector, install glove compartment lining and lid and finally reconnect negative battery cable.
Related Volvo 940 Parts
 Volvo 940 Distributor
 Volvo 940 Distributor Cap
 Volvo 940 Mass Air Flow Sensor
 Volvo 940 Ignition Control Module
 Volvo 940 Oxygen Sensor
 Volvo 940 Air Bag
 Volvo 940 Body Control Module
 Volvo 940 Coolant Temperature Sensors
 Volvo 940 Cruise Control Module
 Volvo 940 Oil Pressure Switch
 Volvo 940 Seat Heater Pad
 Volvo 940 Spark Plug Wire