×
- Hello
- Login or Register
- Quick Links
- Live Chat
- Track Order
- Parts Availability
- RMA
- Help Center
- Contact Us
- Shop for
- Volvo Parts
My Garage
My Account
Cart
Genuine Volvo 940 Fog Light
Fog Lamp- Select Vehicle by Model
- Select Vehicle by VIN
Select Vehicle by Model
orMake
Model
Year
Select Vehicle by VIN
For the most accurate results, select vehicle by your VIN (Vehicle Identification Number).
2 Fog Lights found

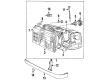
Volvo 940 Fog Lamp, Front Part Number: 1392712
$108.16 MSRP: $127.70You Save: $19.54 (16%)Ships in 1-2 Business DaysVolvo 940 Fog Lamp, Front Part Number: 1392713
$108.16 MSRP: $127.70You Save: $19.54 (16%)Ships in 1-2 Business Days
Volvo 940 Fog Light
OEM parts are the only choice for top quality and real functionality. They pass strict checks, and they match Volvo's factory specs, so installation is easy. If you need new Fog Light and you want quality and fit. You will find both here. Our site has a wide range of OEM Volvo 940 parts. The prices are unbeatable, allowing you to get value for money. Each genuine 940 Fog Light comes with the manufacturer's warranty. That gives you peace of mind. We ship fast to your door. Order today, and enjoy a smooth, no-hassle upgrade with parts that fit right.
Volvo 940 Fog Light Parts and Q&A
- Q: How to remove and install a fog light lens, and How to ensure proper operation and aiming on Volvo 940?A:To remove the fog lamp lens, use a small pry tool, then rotate the light bulb counterclockwise to remove it from the fog light housing and pull it out. For installation, insert the new bulb in the housing and turn it clockwise to lock it, followed by snapping the lens back on the fog lamp assembly. Test the lights to be sure they operate correctly and if you have any problems with the lights, they should be checked for a bad light bulb, dirty socket, faulty wiring or a blown fuse. Before installing aftermarket auxiliary lights, check whether they are legal to use on the road, as they should have a DOT approval number and should also be legal to use in that area. Disconnect the negative battery cable and unpack the light kit and select a suitable location for the lights, preferably underneath the bumper for fog lights and on top for driving lights. Drill the necessary holes for mounting and secure the lights with the included hardware and install the relay in an immovable area of the engine compartment with terminals facing down to prevent water from getting in. Connect a wire from the ground connection of the relay to a good ground source and then connect wires from the light to the fog/driving lamps and from the ignition to the light switch. Install the light switch in an appropriate position and attach it to a constant power source as per the local laws. Finally, wire with an inline fuse from the power terminal on the relay to the battery, reconnect the negative battery cable and turn on the lights to adjust the pattern if necessary. To aim, put the vehicle on level ground facing a flat wall about 25 feet away and turn on the lights, and loosen the mounting hardware to adjust the beam so that the distance between the lights is horizontal and the fog lights are 4 inches lower than the center of the lamp lens and the driving lights are aligned with the center of the lenses. Tighten the hardware and test the lights for proper functioning with an even pattern.
Related Volvo 940 Parts
 Volvo 940 Headlight
 Volvo 940 Bulb Socket
 Volvo 940 Car Bulbs
 Volvo 940 Daytime Running Lights
 Volvo 940 Headlight Screws
 Volvo 940 Side Marker Lights
 Volvo 940 Tail Light Lens
 Volvo 940 Turn Signal Lights