×
- Hello
- Login or Register
- Quick Links
- Live Chat
- Track Order
- Parts Availability
- RMA
- Help Center
- Contact Us
- Shop for
- Volvo Parts
My Garage
My Account
Cart
Genuine Volvo 940 Control Arm
Suspension Arm- Select Vehicle by Model
- Select Vehicle by VIN
Select Vehicle by Model
orMake
Model
Year
Select Vehicle by VIN
For the most accurate results, select vehicle by your VIN (Vehicle Identification Number).
4 Control Arms found

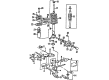
Volvo 940 Control Arm, Driver Side Part Number: 1387682
$149.14 MSRP: $176.09You Save: $26.95 (16%)Ships in 1-2 Business Days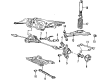
Volvo 940 Lower Control Arm Part Number: 3530450
$178.75 MSRP: $211.04You Save: $32.29 (16%)Ships in 1-2 Business Days
Volvo 940 Control Arm, Passenger Side Part Number: 1387207
$376.43 MSRP: $486.34You Save: $109.91 (23%)Ships in 1-2 Business Days
Volvo 940 Support Arm, Driver Side Part Number: 3530912
$435.37 MSRP: $562.49You Save: $127.12 (23%)Ships in 1-2 Business Days
Volvo 940 Control Arm
The Volvo 940 Control Arm is the crucial hinged component that ensures that each front wheel moves freely, keeping it well aligned with the frame of the car. It forms the anchor of the suspension, with the Control Arm connecting one end to the chassis by huge rubber bushings and the other to the steering knuckle by a precise ball joint, allowing the wheel to rise over bumps and keeping the sideways position of the wheel. Volvo provided the arm in two constructions over the years. The early 940 models were made with stamped steel, which is a robust and heavy metal plate that can rust over many winters and is difficult to work with when making bushing swaps. Subsequent vehicles were built of cast iron or cast aluminum, which are lower in weight but no less resistant to corrosion. No matter what material is applied, the Control Arm makes use of radius rods in the MacPherson strut design of Volvo front suspensions to prevent movement of the wheels from front to back, and it directs the forces of the road to the springs or shocks that are packed in the area. The wear is mostly noticed in the bushings and ball joint, but the major ones are curb hits or severe potholes that may bend the steel or break a casting and may require the entire arm to be replaced. A large portion of Volvo drivers likes the fact that this simple lever, the Control Arm, softly smooths out every journey without making a sound, keeping the brand known for its solid ride.
OEM parts are the only choice for top quality and real functionality. They pass strict checks, and they match Volvo's factory specs, so installation is easy. If you need new Control Arm and you want quality and fit. You will find both here. Our site has a wide range of OEM Volvo 940 parts. The prices are unbeatable, allowing you to get value for money. Each genuine 940 Control Arm comes with the manufacturer's warranty. That gives you peace of mind. We ship fast to your door. Order today, and enjoy a smooth, no-hassle upgrade with parts that fit right.
Volvo 940 Control Arm Parts and Q&A
- Q: How to remove and install components with a focus on the lower Control Arm on Volvo 940?A:To remove and install components for cars other than the 850, 960 Sedan, and 1998 models, follow these steps. Raise and secure the vehicle, then remove the rear wheels. Use a hydraulic jack to raise the rear axle housing sufficiently to compress the spring and shock and then position a compressor on the spring (leaving at least three coils between the points of attachment). Remove the bolts and nut on the bottom of the shock, lower the rear axle and remove the spring. If equipped, remove the Sway Bar from the Trailing Arms and the axle to frame through bolt that holds the trailing arm to the vehicle body and loosen and remove the through bolt that holds the trailing arm to the rear axle. With the rear axle supported, cut off the trailing arm. For installation, connect the control arm to the axle housing and tighten the bolt finger-tight, and hoist the assembly to position and install the axle-to-frame bolts finger-tight. Install the shock and coil spring, tightening all control arm bolts to 85 ft. lbs. (115 Nm) then reinstall the wheels and lower the vehicle. For the 1992-94 960 sedan, make sure the alignment is correct after removing the parts, raise and prop the car, remove the wheels and remove the protective guard. Remove the retaining bolts for the control arm bracket and the rear control arm bolt and separate the control arm from the wheel bearing housing. Support the arm with jacks, relieve system tension on the Shock Absorber and remove the retaining bolt at the top of the shock. Lower the jacks to release the arm with the spring and shock on and unbolt the shock from the arm and remove the front bracket. Install the control arm bracket properly and tighten the nut and then put on the shock absorber and tighten the bottom mount. Install the bottom spring seat and spring, raising the assembly into position and compressing the spring, and install the shock. Reinstall the control arm bracket bolts and tighten then tap the rear control arm into place and tighten the bolt. Reinstall the protective cover, and installing the wheel, put the vehicle down, and tighten the lugs. For 1995-98 960/S90/V90, make sure the alignment is correct after disassembly, raise the vehicle and support it, and use a compression tool to apply the axle support beam. Compress the suspension a bit and remove the shock absorber mounting bolt and the sway bar. Remove support arm bolts and loosen support arm bracket nut, and then tap support arm off wheel bearing housing. Remove the brake caliper, lower the compression tool and inspect the bushings on the lower control arm. For installation, attach the lower control arm using a new nut and bolt, install the spring and use the compression tool to lift the control arms. Tighten the control arm to the wheel bearing housing and put on the brake caliper. Attach the rear support arm using new bolts and nuts and tighten the rear bolt and front nut and finally the front bolts. Install the shock absorber, lower the sway bar into position, install the wheels, lower the vehicle, tighten the sway bar bolts and check the wheel alignment. For V70 AWD models, jack up and support the vehicle, remove the shocks and spring, remove the support arm from the control arm and remove the control arm. For installation, connect the control arm, install the support arm and tighten the bolt, then re-install the spring and shocks, and lower the vehicle.
- Q: How to remove and install components on a upper Control Arm on Volvo 940?A:To remove and install components on a 1992-94 960 Sedan, first start by safely lifting and supporting the vehicle, making sure that front supports are as far forward as possible. Remove the wheels, then remove the brake caliper without disconnecting the brake hose and secure it with wire out of the way. Remove the bolt that connects the lower support arm on to the wheel bearing housing and tap it loose, followed by the nut and bolt for the lower control arm. Disconnect the track rod from the wheel bearing housing by using a small bearing puller, remove the nut that holds the upper control arm to the housing, making note of the alignment shims for reinstallation. Remove the rear upper control arm from the rear axle member and the front nut and bolt securing it to the rear axle member. Remove the control arm from the vehicle by using adjustable pliers. For installation, fix the arm to the rear axle member using the nut and bolt then install both the front and rear mounts. Now reinstall the spacers at the wheel bearing housing and tighten the nut. Tighten the rearmost nut at the rear axle support to 62 ft. lbs. and the front nut and bolt to 51 ft. lbs. with an additional 60 degrees of rotation. Pull out the top of the wheel bearing housing for proper alignment and tighten the upper control arm nut to 84 ft. lbs. Next, pull the wheel bearing housing inward and install the lower control arm and tighten the nut to 37 ft. lbs. plus 90 degrees of rotation. Reinstall the support arm and tighten the mount to 44 ft. lbs. plus an additional 90 degrees of rotation and install the track rod and tighten to 62 ft. lbs. Finally, reinstall the brake caliper and wheels, lower the vehicle and check the rear alignment if need be. For 1995-98 960/S90/V90 raise and support the vehicle remove the wheel and apply light pressure to the link arm with a compression tool. Disconnect the Shock Absorber from the support arm, and remove bolts on Sway Bars, and fully compress the tool. Remove the brake caliper and suspend it in a safe place, remove the upper control arm from the wheel bearing housing, by using a brass drift to tap out the bolt. Disconnect the track rod and lower control arm in a similar fashion and the wheel bearing housing will rest on the lower control arm. Remove the front and rear bolts from the upper control arm and then pull it from the rear axle beam. For installation, attach the upper control arm with new bolts, which should be tightened to 18 ft. lbs. Connect the wheel bearing housing to the upper control arm with a new nut, but do not tighten yet. Connect the support arm and lower control arm to the wheel bearing housing, the respective bolts installed without tightening. Tighten all attaching bolts and nuts in the specified sequence Tighten brake caliper and tighten bolts to 47 ft. lbs. Install shock absorber and tighten bolt to 63 ft. lbs. Release compression tool pressure Connect sway bar to support arm with new bolts without tightening Install wheels and lower vehicle.
Related Volvo 940 Parts
 Volvo 940 ABS Reluctor Ring
 Volvo 940 Axle Beam
 Volvo 940 Axle Beam Mount
 Volvo 940 Axle Support Bushings
 Volvo 940 Coil Springs
 Volvo 940 Control Arm Bushing
 Volvo 940 Control Arm Nut
 Volvo 940 Shock And Strut Mount
 Volvo 940 Steering Knuckle
 Volvo 940 Strut Bearing
 Volvo 940 Trailing Arm
 Volvo 940 Trailing Arm Bushing