×
- Hello
- Login or Register
- Quick Links
- Live Chat
- Track Order
- Parts Availability
- RMA
- Help Center
- Contact Us
- Shop for
- Volvo Parts
My Garage
My Account
Cart
Genuine Volvo 244 Brake Caliper
Caliper- Select Vehicle by Model
- Select Vehicle by VIN
Select Vehicle by Model
orMake
Model
Year
Select Vehicle by VIN
For the most accurate results, select vehicle by your VIN (Vehicle Identification Number).
2 Brake Calipers found

Volvo 244 Alternator Part Number: 271362
$179.19 MSRP: $235.07You Save: $55.88 (24%)Ships in 1-2 Business Days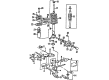
Volvo 244 Caliper, Driver Side Part Number: 5002026
Volvo 244 Brake Caliper
OEM parts are the only choice for top quality and real functionality. They pass strict checks, and they match Volvo's factory specs, so installation is easy. If you need new Brake Caliper and you want quality and fit. You will find both here. Our site has a wide range of OEM Volvo 244 parts. The prices are unbeatable, allowing you to get value for money. Each genuine 244 Brake Caliper comes with the manufacturer's warranty. That gives you peace of mind. We ship fast to your door. Order today, and enjoy a smooth, no-hassle upgrade with parts that fit right.
Volvo 244 Brake Caliper Parts and Q&A
- Q: Is absolute cleanliness essential when dismantling and reassembling rear brake calipers on Volvo 244?A:Absolute cleanliness is essential when dismantling and reassembling these units, so clean out the outside well before beginning. When dismantling ATE type brake calipers, mark the pistons in order to be able to refit them in the same position on the rim step. Remove any dust cover retaining rings and the dust covers themselves, then put a piece of wood about 1/2 inch thick between the pistons and push the pistons out of the caliper using compressed air by means of a hand or foot operated tyre pump, and apply the air at a low pressure. If you have a jammed piston, a local garage might help with a high pressure air line. Carefully remove the inner sealing rings with a small screwdriver making no scratches on the bore or damage on the groove and consider rounding off the corners of the screwdriver. Unscrew the bleed nipples and hose connections but do not try to separate the two halves, as to reassemble the assembly requires special equipment. Clean the various parts and connecting paths thoroughly with methylated spirit which will not affect the rubber seals, and with a lint-free rag (use a hair dryer for the fluid pathways to make sure all the methylated spirit is removed). Inspect the parts carefully; if any cylinders are scored or scratched the entire cylinder housing must be replaced along with any other damaged or worn parts. Reassembly is simple, coat the different parts with brake fluid before reassembling, the inner sealing rings should be installed into their respective grooves in the correct direction, and then the pistons with the large ends should be installed inside the housings. For ATE type brakes, make sure that the outer end of the piston is inclined by an angle of 20 degrees (use a special tool for this purpose if necessary). If replacing a piston, compare the new one with the old and make the same marks.
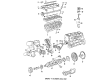
- Q: What features are illustrated in the front brake caliper assembly diagram on Volvo 244?A:The front brake caliper assembly has a diagram that depicts the brake caliper, which includes two halves called the inner and outer half which are bolted together on either side of the Brake Disc. Each half has two cylinders and pistons with the outer half sawed off to expose the cylinder and piston assembly. One of the nipples called a bleed nipple is included in the cutaway part, as well as those in the diagram. The upper cylinders are connected together and are fed from one hydraulic circuit whereas the lower cylinders are fed from another. Sealing rings are not only there to stop the leakage of brake fluid, but they act as return springs for the pistons. These rings return to their original shape when hydraulic pressure is released and the piston is slightly retracted back automatically, which compensates the brake pad wear automatically without having to adjust the brake. The rear brake caliper assembly is much like the front, and has a diagram of each rear caliper having one single cylinder, supplied by individual hydraulic circuits so that half of the braking effort at the rear is maintained even with the failure of one circuit.


