×
- Hello
- Login or Register
- Quick Links
- Live Chat
- Track Order
- Parts Availability
- RMA
- Help Center
- Contact Us
- Shop for
- Volvo Parts
My Garage
My Account
Cart
Genuine 1987 Volvo 245 Axle Shaft
Car Axle Shaft- Select Vehicle by Model
- Select Vehicle by VIN
Select Vehicle by Model
orMake
Model
Year
Select Vehicle by VIN
For the most accurate results, select vehicle by your VIN (Vehicle Identification Number).
2 Axle Shafts found


1987 Volvo 245 Axle Shaft Part Number: 8250145
$160.54 MSRP: $189.54You Save: $29.00 (16%)Ships in 1-2 Business DaysProduct Specifications- Other Name: Axle Shaft, External
- Condition: New
- Fitment Type: Direct Replacement
- SKU: 8250145
- Warranty: This genuine part is guaranteed by Volvo's factory warranty.
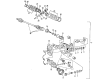
1987 Volvo 245 Axle Shaft Part Number: 3502336
$428.83 MSRP: $549.78You Save: $120.95 (22%)Ships in 1-2 Business DaysProduct Specifications- Other Name: Drive Shaft 2602; Axle Assembly, Axle Shaft Assembly, Drive Axle
- Condition: New
- Fitment Type: Direct Replacement
- SKU: 3502336
- Warranty: This genuine part is guaranteed by Volvo's factory warranty.
1987 Volvo 245 Axle Shaft Parts and Q&A
- Q: Is it advisable to dismantle the differential without the proper tools or suitable substitutes for the Axle Shaft on 1987 Volvo 245?A: Unless certain tools are available or suitable substitutes can be made, the dismantling of the differential is not recommended because of the expenses of possible damage to unworn components if the differential is not removed correctly. Before any work the axle housing has to be stretched to make it possible to extract the crownwheel and differential assembly which can be done with specific Volvo tools or heavy duty bolts. A micrometer and a new set of crownwheel bolts are also required for the stretch in the original bolts. The rear axle should be removed and the cover taken off to see if there are alignment marks on the bearing caps and case, if not, dot punching is recommended. It is good to check the meshing of the crownwheel and pinion for any fault indications. After removal of the bearing caps, the expansion tool should be fitted to stretch the axle housing sufficiently to allow the crownwheel and differential assembly to be lifted out and the inside of the housing should be washed out. The nut on the pinion shaft should be undone to pull off the coupling flange and the dust cover, oil slinger and oil seal extracted. The shaft and pinion are then driven out, leaving in the housing the outer ring of the rear bearing and the front bearing, in which are found shims that control the extension and end play of the pinion. The front bearing is driven out and the bearing shims should be kept organized for reassembly. The crownwheel and cage should be marked and the securing bolts then removed to separate them. The locking pin and differential gears with thrust washers are then removed, and the bearings pulled off the cage ends, making sure that they are stored correctly to be put back in place. Every parts should be carefully cleaned and bearing races and bearing should be checked for damages. The crownwheel and pinion teeth should also be checked for any damage-slight scuff marks on them do not necessarily need to be renewed. Reassembly starts with the differential cage, side gears, and pinions to insure cleanliness and dryness for correct thickness and loading tolerances. Side play of side gears should be checked and adjusted if needed followed by locking the shaft with the locking pin. The crownwheel is then fitted with the bolt locking plate, drawn down with fixing bolts and tightened to the specified torque. For the pinion in which case the original shims are to be used if applicable or shim thickness adjusted according to marking codes. After fitting the shims and back bearing the assembly is placed in the case; the meshing of the crownwheel with the pinion is then checked by using marker blue to observe the pattern. It may be necessary to adjust shim thickness to accomplish even spacing. Once correct the original front shim thickness is restored and the front bearing and flange are fitted without the oil seal or slinger for a trial run. End play is adjusted to bring to the point of slight stiffness, with particular measurements for guiding the process. After the shims have been verified as being correct, the oil seal, oil slinger, and dust cover are installed, and the flange is bolted with a new nut. The final adjustments are the selection of shim thickness somewhat less than the original, an end play check and area equality in meshing patterns. Once the shims have been finalized, the assembly is reinserted with the help of the expansion tool, bearing caps are fitted and tightened, and the inspection cover is bolted down with a new gasket. The halfshafts are reinstalled and the axle is refilled with the appropriate grade and amount of oil, and the process is complete.
Related 1987 Volvo 245 Parts
 1987 Volvo 245 Axle Shaft Seal
 1987 Volvo 245 Differential Cover
 1987 Volvo 245 Driveshaft Center Support Bearing
 1987 Volvo 245 Ring And Pinion
 1987 Volvo 245 Universal Joints