×
- Hello
- Login or Register
- Quick Links
- Live Chat
- Track Order
- Parts Availability
- RMA
- Help Center
- Contact Us
- Shop for
- Volvo Parts
My Garage
My Account
Cart
Genuine Volvo V70 Control Arm
Suspension Arm- Select Vehicle by Model
- Select Vehicle by VIN
Select Vehicle by Model
orMake
Model
Year
Select Vehicle by VIN
For the most accurate results, select vehicle by your VIN (Vehicle Identification Number).
31 Control Arms found

Volvo V70 Control Arm, Passenger Side Part Number: 8628496
$178.39 MSRP: $263.26You Save: $84.87 (33%)Ships in 1-2 Business DaysVolvo V70 Control Arm, Driver Side Part Number: 8628497
$180.76 MSRP: $266.76You Save: $86.00 (33%)Ships in 1-2 Business DaysVolvo V70 Control Arm, Passenger Side Part Number: 8628498
$198.80 MSRP: $301.21You Save: $102.41 (34%)Ships in 1-2 Business DaysVolvo V70 Control Arm, Driver Side Part Number: 8628495
$218.44 MSRP: $330.97You Save: $112.53 (34%)Ships in 1-2 Business Days
Volvo V70 Control Arm, Driver Side Part Number: 30760586
$238.07 MSRP: $360.71You Save: $122.64 (34%)Ships in 1-2 Business DaysVolvo V70 Control Arm, Passenger Side Part Number: 30760587
$238.07 MSRP: $360.71You Save: $122.64 (34%)Ships in 1-2 Business Days
Volvo V70 Lower Control Arm, Driver Side Part Number: 30666559
$104.75 MSRP: $123.67You Save: $18.92 (16%)Ships in 1-2 Business Days
Volvo V70 Upper Control Arm, Driver Side Part Number: 31406746
$136.17 MSRP: $175.85You Save: $39.68 (23%)Ships in 1-2 Business Days
Volvo V70 Upper Control Arm, Passenger Side Part Number: 31406747
$136.17 MSRP: $175.85You Save: $39.68 (23%)Ships in 1-2 Business Days
Volvo V70 Upper Control Arm Part Number: 31406752
$136.17 MSRP: $175.85You Save: $39.68 (23%)Ships in 1-2 Business Days
Volvo V70 Upper Control Arm Part Number: 31406753
$136.17 MSRP: $175.85You Save: $39.68 (23%)Ships in 1-2 Business Days
Volvo V70 Lower Control Arm Part Number: 31317602
$166.25 MSRP: $214.69You Save: $48.44 (23%)Ships in 1-2 Business Days

Volvo V70 Control Arm, Driver Side Part Number: 36051002
$236.43 MSRP: $312.04You Save: $75.61 (25%)Ships in 1-2 Business DaysVolvo V70 Control Arm, Passenger Side Part Number: 36051003
$236.43 MSRP: $312.04You Save: $75.61 (25%)Ships in 1-2 Business DaysVolvo V70 Control Arm, Driver Side Part Number: 36051004
$203.00 MSRP: $306.79You Save: $103.79 (34%)Ships in 1-2 Business DaysVolvo V70 Control Arm, Passenger Side Part Number: 36051005
$203.00 MSRP: $306.79You Save: $103.79 (34%)Ships in 1-2 Business Days
Volvo V70 Lateral Link Part Number: 31262931
$73.76 MSRP: $99.13You Save: $25.37 (26%)Ships in 1-2 Business Days
Volvo V70 Upper Control Arm, Driver Side Part Number: 30714701
$106.37 MSRP: $135.25You Save: $28.88 (22%)Ships in 1-2 Business Days
Volvo V70 Lower Control Arm, Driver Side Part Number: 30666533
$108.16 MSRP: $127.70You Save: $19.54 (16%)Ships in 1-2 Business DaysVolvo V70 Lower Control Arm, Driver Side Part Number: 30666534
$108.16 MSRP: $127.70You Save: $19.54 (16%)Ships in 1-2 Business Days
| Page 1 of 2 |Next >
1-20 of 31 Results
Volvo V70 Control Arm
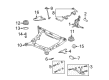
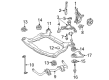
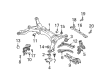
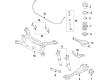
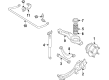
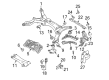
The Volvo V70 Control Arm is a design that supports ride comfort, whereby it connects the chassis together with the front wheel, whereby the suspension moves in harmony without compromising the steering. This important component serves as a hinged connection to which shocks, springs, and sway bar fittings are connected, and as such, when bumps push a wheel up, the arm pivots on the rubber bushings and ball joints, the spring takes the load, and the wheel is immediately redirected into its normal path. Even in modern versions of the Volvo V70, the geometry can take on braking and cornering loads. Early Volvo wagons, including the V70, applied stamped steel, which is cheap but susceptible to corrosion, which leads to the loss of unsprung mass and sharp driving qualities, so the redesigned Control Arm was both strong and light. The material transition is the same, but all the styles have the triangular or A-shaped profile, have a single inboard pivot, and an outboard joint on the knuckle which transfers cornering and braking forces directly into the subframe. Common wear locations include wear in the bushings, and these include tire edge wear, pulling sideways, or vibration at highway speeds, and thus changing the bushings can restore the factory experience without having to replace the entire Control Arm. Should the arm be bent as a result of a curb strike or a collision, to be on the safe side, one can replace it and still retain the self-possessed, confident ride Volvo owners desire.
OEM parts are the only choice for top quality and real functionality. They pass strict checks, and they match Volvo's factory specs, so installation is easy. If you need new Control Arm and you want quality and fit. You will find both here. Our site has a wide range of OEM Volvo V70 parts. The prices are unbeatable, allowing you to get value for money. Each genuine V70 Control Arm comes with the manufacturer's warranty. That gives you peace of mind. We ship fast to your door. Order today, and enjoy a smooth, no-hassle upgrade with parts that fit right.
Volvo V70 Control Arm Parts and Q&A
- Q: How to remove and refit the ball joint and control arm on Volvo V70?A:To remove the control arm, first loosen the appropriate front wheel bolts, chock the rear wheels, apply the handbrake, jack up the front of the vehicle, and support it on axle stands. Remove the roadwheel, then release the screws and take off the engine undershield. Next, undo the nut securing the balljoint shank to the control arm using a Torx bit to counterhold the nut, then lever the arm downwards over the end of the balljoint shank. If necessary, undo the two bolts and remove the balljoint from the base of the hub carrier; if it is difficult to remove, use a slide hammer attached to the balljoint shank. For the left-hand control arm, undo the two inner mounting bolts, withdraw them, and remove the arm from the vehicle, noting that new bolts will be required for refitting. For the right-hand control arm, raise the engine approximately 25 mm, pull the plastic cover on top of the engine straight up, undo the bolts securing the engine cross stay to the brackets on the suspension turrets, and position a workshop jack under the engine sump with a block of wood to protect the casing. Then, undo the bolts securing the right-hand engine mounting to the cylinder block and the bolts/nuts securing the front engine tie-rod and rear mounting pad to the subframe. Use the jack to raise the engine approximately 25 mm to access the control arm inner bolts, undo them, and maneuver the arm from the vehicle, noting that new bolts will be required. For the overhaul, clean the control arm and the area around the mountings, inspect for cracks, damage, or distortion, and check the inner pivot bushes for signs of swelling or deterioration. If either bush requires renewal, it should be entrusted to a Volvo dealer or specialist, as a hydraulic press and suitable spacers are needed for removal and refitting, along with a setting gauge for accurate positioning. For refitting, locate the arm in its mountings, fit the new mounting bolts and nuts, and tighten them to the specified torque. If the balljoint was removed, refit it to the hub carrier and tighten the new retaining bolts to the specified torque. Engage the balljoint shank in the control arm, tighten the new nut to the specified torque, followed by the specified angle, and complete the refitting as a reversal of the removal process.


