×
- Hello
- Login or Register
- Quick Links
- Live Chat
- Track Order
- Parts Availability
- RMA
- Help Center
- Contact Us
- Shop for
- Volvo Parts
My Garage
My Account
Cart
Genuine Volvo V50 Control Arm
Suspension Arm- Select Vehicle by Model
- Select Vehicle by VIN
Select Vehicle by Model
orMake
Model
Year
Select Vehicle by VIN
For the most accurate results, select vehicle by your VIN (Vehicle Identification Number).
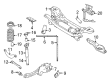
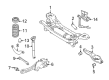
9 Control Arms found

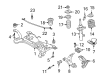
Volvo V50 Lower Control Arm, Passenger Side Part Number: 31277462
$238.07 MSRP: $360.71You Save: $122.64 (34%)Ships in 1-2 Business DaysVolvo V50 Lower Control Arm, Driver Side Part Number: 31277463
$238.07 MSRP: $360.71You Save: $122.64 (34%)Ships in 1-2 Business Days

Volvo V50 Lower Control Arm, Driver Side Part Number: 31277464
$238.07 MSRP: $360.71You Save: $122.64 (34%)Ships in 1-2 Business DaysVolvo V50 Lower Control Arm, Passenger Side Part Number: 31277465
$238.07 MSRP: $360.71You Save: $122.64 (34%)Ships in 1-2 Business Days
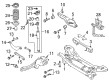
Volvo V50 Upper Control Arm Part Number: 31277305
$43.10 MSRP: $55.20You Save: $12.10 (22%)Ships in 1-2 Business Days
Volvo V50 Upper Control Arm Part Number: 30681512
$168.55 MSRP: $226.51You Save: $57.96 (26%)Ships in 1-2 Business Days
Volvo V50 Lower Control Arm Part Number: 30639917
$176.88 MSRP: $228.41You Save: $51.53 (23%)Ships in 1-2 Business Days
Volvo V50 Lower Control Arm, Front Passenger Side Part Number: 30736922
$166.25 MSRP: $214.69You Save: $48.44 (23%)Ships in 1-2 Business DaysVolvo V50 Lower Control Arm Part Number: 31277584
$166.25 MSRP: $214.69You Save: $48.44 (23%)Ships in 1-2 Business Days
Volvo V50 Control Arm
OEM parts are the only choice for top quality and real functionality. They pass strict checks, and they match Volvo's factory specs, so installation is easy. If you need new Control Arm and you want quality and fit. You will find both here. Our site has a wide range of OEM Volvo V50 parts. The prices are unbeatable, allowing you to get value for money. Each genuine V50 Control Arm comes with the manufacturer's warranty. That gives you peace of mind. We ship fast to your door. Order today, and enjoy a smooth, no-hassle upgrade with parts that fit right.
Volvo V50 Control Arm Parts and Q&A
- Q: Can the ball joint be purchased separately from the control arm, and How to remove and refit it on Volvo V50?A:The balljoint is not available separately to the control arm but, if defective, the control arm/balljoint assembly will need renewing. To start removal, slacken the driveshaft retaining bolt, loosen the wheel nuts and then raise and support the front of the car and remove the roadwheel and engine undershield. Next, remove the driveshaft retaining bolt and discard it (a new one will be required during reassembly). Loosen the nut until it is level with the end of the balljoint shank and use a balljoint separator tool to remove the suspension control arm balljoint from the hub carrier by using an Allen key in the end of the balljoint shank to prevent rotation while loosening the nut. Use a stout bar to lever the control arm downwards and over the end of the balljoint shank, taking care not to damage the balljoint dust cover. Undo the two bolts holding the control arm back mounting and the one bolt holding the front mounting and work the control arm from underneath the car, removing the bolts as new ones will be required. For overhaul, thoroughly clean the control arm and the area around the mountings and inspect the arm for cracks, damage or distortion and carefully check the inner pivot bushes for swelling, cracks or deterioration of the rubber. If both bushes need renewal, it is recommended to seek the help of a Volvo dealer or specialist as a hydraulic press and appropriate spacers are necessary for removing and refitting the bushes along with a setting gauge to measure the correct positioning of the bushes. For refitting, locate the arm in its mountings, and fit the new mounting bolts, tightening them to the specified torque. Engage the balljoint shank in the control arm, and tighten the new nut to the specified torque, the rest of the refitting process being a reversal of the removal steps.

Related Volvo V50 Parts
 Volvo V50 Axle Beam
 Volvo V50 Axle Support Bushings
 Volvo V50 Coil Spring Insulator
 Volvo V50 Coil Springs
 Volvo V50 Shock and Strut Boot
 Volvo V50 Steering Knuckle
 Volvo V50 Sway Bar Bracket
 Volvo V50 Sway Bar Bushing
 Volvo V50 Sway Bar Link
 Volvo V50 Track Bar
 Volvo V50 Trailing Arm
 Volvo V50 Trailing Arm Bushing