×
- Hello
- Login or Register
- Quick Links
- Live Chat
- Track Order
- Parts Availability
- RMA
- Help Center
- Contact Us
- Shop for
- Volvo Parts
My Garage
My Account
Cart
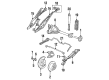
Genuine Volvo 245 Shock Absorber
Suspension Shock Absorber- Select Vehicle by Model
- Select Vehicle by VIN
Select Vehicle by Model
orMake
Model
Year
Select Vehicle by VIN
For the most accurate results, select vehicle by your VIN (Vehicle Identification Number).
4 Shock Absorbers found

Volvo 245 Shock Absorber Part Number: 9140553
$386.66 MSRP: $585.85You Save: $199.19 (34%)Ships in 1-2 Business Days
Volvo 245 Shock Absorber Part Number: 1206641
$121.82 MSRP: $143.83You Save: $22.01 (16%)Ships in 1-2 Business Days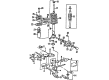
Volvo 245 Shock Absorber Part Number: 273662
$149.14 MSRP: $176.09You Save: $26.95 (16%)Ships in 1-2 Business DaysVolvo 245 Strut Part Number: 3530485
$189.70 MSRP: $225.83You Save: $36.13 (16%)Ships in 1-2 Business Days
Volvo 245 Shock Absorber
OEM parts are the only choice for top quality and real functionality. They pass strict checks, and they match Volvo's factory specs, so installation is easy. If you need new Shock Absorber and you want quality and fit. You will find both here. Our site has a wide range of OEM Volvo 245 parts. The prices are unbeatable, allowing you to get value for money. Each genuine 245 Shock Absorber comes with the manufacturer's warranty. That gives you peace of mind. We ship fast to your door. Order today, and enjoy a smooth, no-hassle upgrade with parts that fit right.
Volvo 245 Shock Absorber Parts and Q&A
- Q: How does a Shock Absorber relate to replacing the early type ball joint on Volvo 245?A:To replace the early type Ball Joint you start by raising the vehicle's front, supporting it under the jacking points, and removing the roadwheel. Loosen the cap nut with a peg wrench or special Volvo tool, support the track Control Arm with a jack and detach the tie-rod ball joint from the steering arm with a ball joint splitter tool. Next, remove the stabilizer bar from the link rod and remove the cover from the center of the strut top mounting. Unscrew the brake pipe bracket bolt and undo the strut spindle top nut without removal (holding the flats of the spindle so that it does not rotate). Mark the position of the strut top mounting with regard to the inner wing turret, and then unscrew and remove the 3 strut upper mounting nuts. To do that, lower the jack under the track control arm while holding the strut in place to prevent putting a strain on the brake hoses. Fit clamps to the coil spring to compress it, then unscrew and remove the strut spindle top nut and the top mounting components, as well as the spring. Remove the cap nut and pull out the shock absorber from the strut tube. Loosen the ball joint retaining nut, using a 19.0 mm socket and long extension, hold the tube against rotation using grips. Release the ball joint stud from the tube with the help of a long drift. A new strut insert can be fitted by reversing the removal process and if re-using the original coil spring, keep the clamps until fitted to the strut. If a new coil spring is being installed, open the clamps from the old spring slowly then fit them to the new one. The lower ball joint can be renewed after unbolting it from the track control arm. For refitting follow the reverse order of removal, ensuring to coincide the marks at the turret and that all fixings are tightened to the specified torque to ensure camber angle is correct. For the type ball joint later, the operations are similar but some specific details should be followed to disconnect it from the base of the strut.
- Q: How to remove and refit a wheel, Coil Springs, and Shock Absorber on Volvo 245?A:Jack up the axle and take the wheel off. With the spring is compressed, you can remove the shock absorber, if the spring needs to remove only, it is enough to let go one end of the shock absorber. To remove the spring, remove the top and bottom attachments while it is under compression, and then remove the compression by jacking up the body and, if necessary, letting down the axle until the spring and its spacers can be removed. Refitting is a reversal of unmaking.
Related Volvo 245 Parts
 Volvo 245 Axle Beam
 Volvo 245 Axle Support Bushings
 Volvo 245 Coil Spring Insulator
 Volvo 245 Coil Springs
 Volvo 245 Control Arm
 Volvo 245 Control Arm Bracket
 Volvo 245 Shock And Strut Mount
 Volvo 245 Sway Bar
 Volvo 245 Sway Bar Bracket
 Volvo 245 Sway Bar Link
 Volvo 245 Trailing Arm
 Volvo 245 Wheel Bearing Dust Cap